 B2BROKER
 B2CORE
 B2CORE IB
 B2TRADER
 B2CONNECT
 B2TRANSLATE
 B2BROKER
Deploying your Android app
Learn how to prepare and publish your branded Android app on Google Play
This guide outlines the steps you need to follow to properly prepare your Android app for Google review, approval, and successful publication on Google Play.
These instructions provide general guidance as of the date of publication. You are responsible for completing all required fields in your Google Play Console. Providing incorrect or incomplete information may result in warnings, restrictions, or suspension of your developer account by Google.
Step 1. Compliance checkpoint
Before creating and submitting your Android app for Google review, determine the countries where you want your app to be available and ensure you hold all required licenses and legal permissions for each country.
This process may take time, so obtain the necessary licenses in advance to confirm that you are authorized to offer all configured trading instruments in your B2CORE instance and provide this information during the Google Play review.
To learn more about Google Play policies for financial services and cryptocurrency, refer to their Policy center and specifically to the following:
- Blockchain-based content
- Understanding Google Play’s cryptocurrency exchanges and software wallets policy
Step 2. Prepare required app information
Prepare the following information that will be required when creating your app in the Google Play Console and submitting it for Google review.
Support and legal information
Provide the following details:
- Privacy policy URL — a link to a publicly accessible web page that explains how your app collects, uses, stores, and protects user data.
For Android apps published on Google Play, the privacy policy is mandatory, even if your app collects minimal data. The page must:
- Be publicly available.
- Be hosted on your website or another reliable public domain.
- Clearly describe what data is collected, how it is used, and how users can request account deletion or data removal.
-
Demo account — a demo account that Google can use during the review process (for details, refer to Step 3. Create and configure a demo account in the B2CORE UI).
-
Contact email for Google — an email address used for official communication from Google. This email will be linked to your developer account in Google Play Console.
-
Public developer contact details — contact information visible to users on Google Play, which must include:
- Support email
- Contact phone number
- Website URL
Store Listing information
Prepare the following store listing details for your app:
- App name
- Short description (up to 80 characters)
- Full description (up to 4,000 characters)
- Graphical assets (can be provided by the B2CORE team). To request them, contact android-support@b2broker.com or your account manager.
Step 3. Create and configure a demo account in the B2CORE UI
To be able to review all of your app functionality, the Google reviewers need access to a demo account. For this reason, you need to configure a demo account as follows:
- Verify your demo account by going through all the steps of your configured KYC procedure.
- In the Back Office, examine and enable all the B2CORE UI modules that will be featured in your mobile app. Each module must be properly configured to ensure that your mobile app will not be rejected by Google during review.
- If your app enables its users to transfer or exchange assets, you also need to make sure that there are enough funds on your demo account, so that the Google reviewers are able to check the transfer and exchange functionality as well.
Step 4. Register in the Google Play Console as an Organization
To publish your Android app, you need to register in the Play Console as an organization and create a developer account.
Further on, with each Android release, the B2CORE team will provide new app bundles (.abb files) for you and you will be responsible for managing the regular maintenance of the app.
For more information, refer to Get started with Play Console.
Step 5. Create a new app in the Play Console
To create an app:
Sign in to the Google Play Console.
Select your developer account.
To start a new app, click Create app.
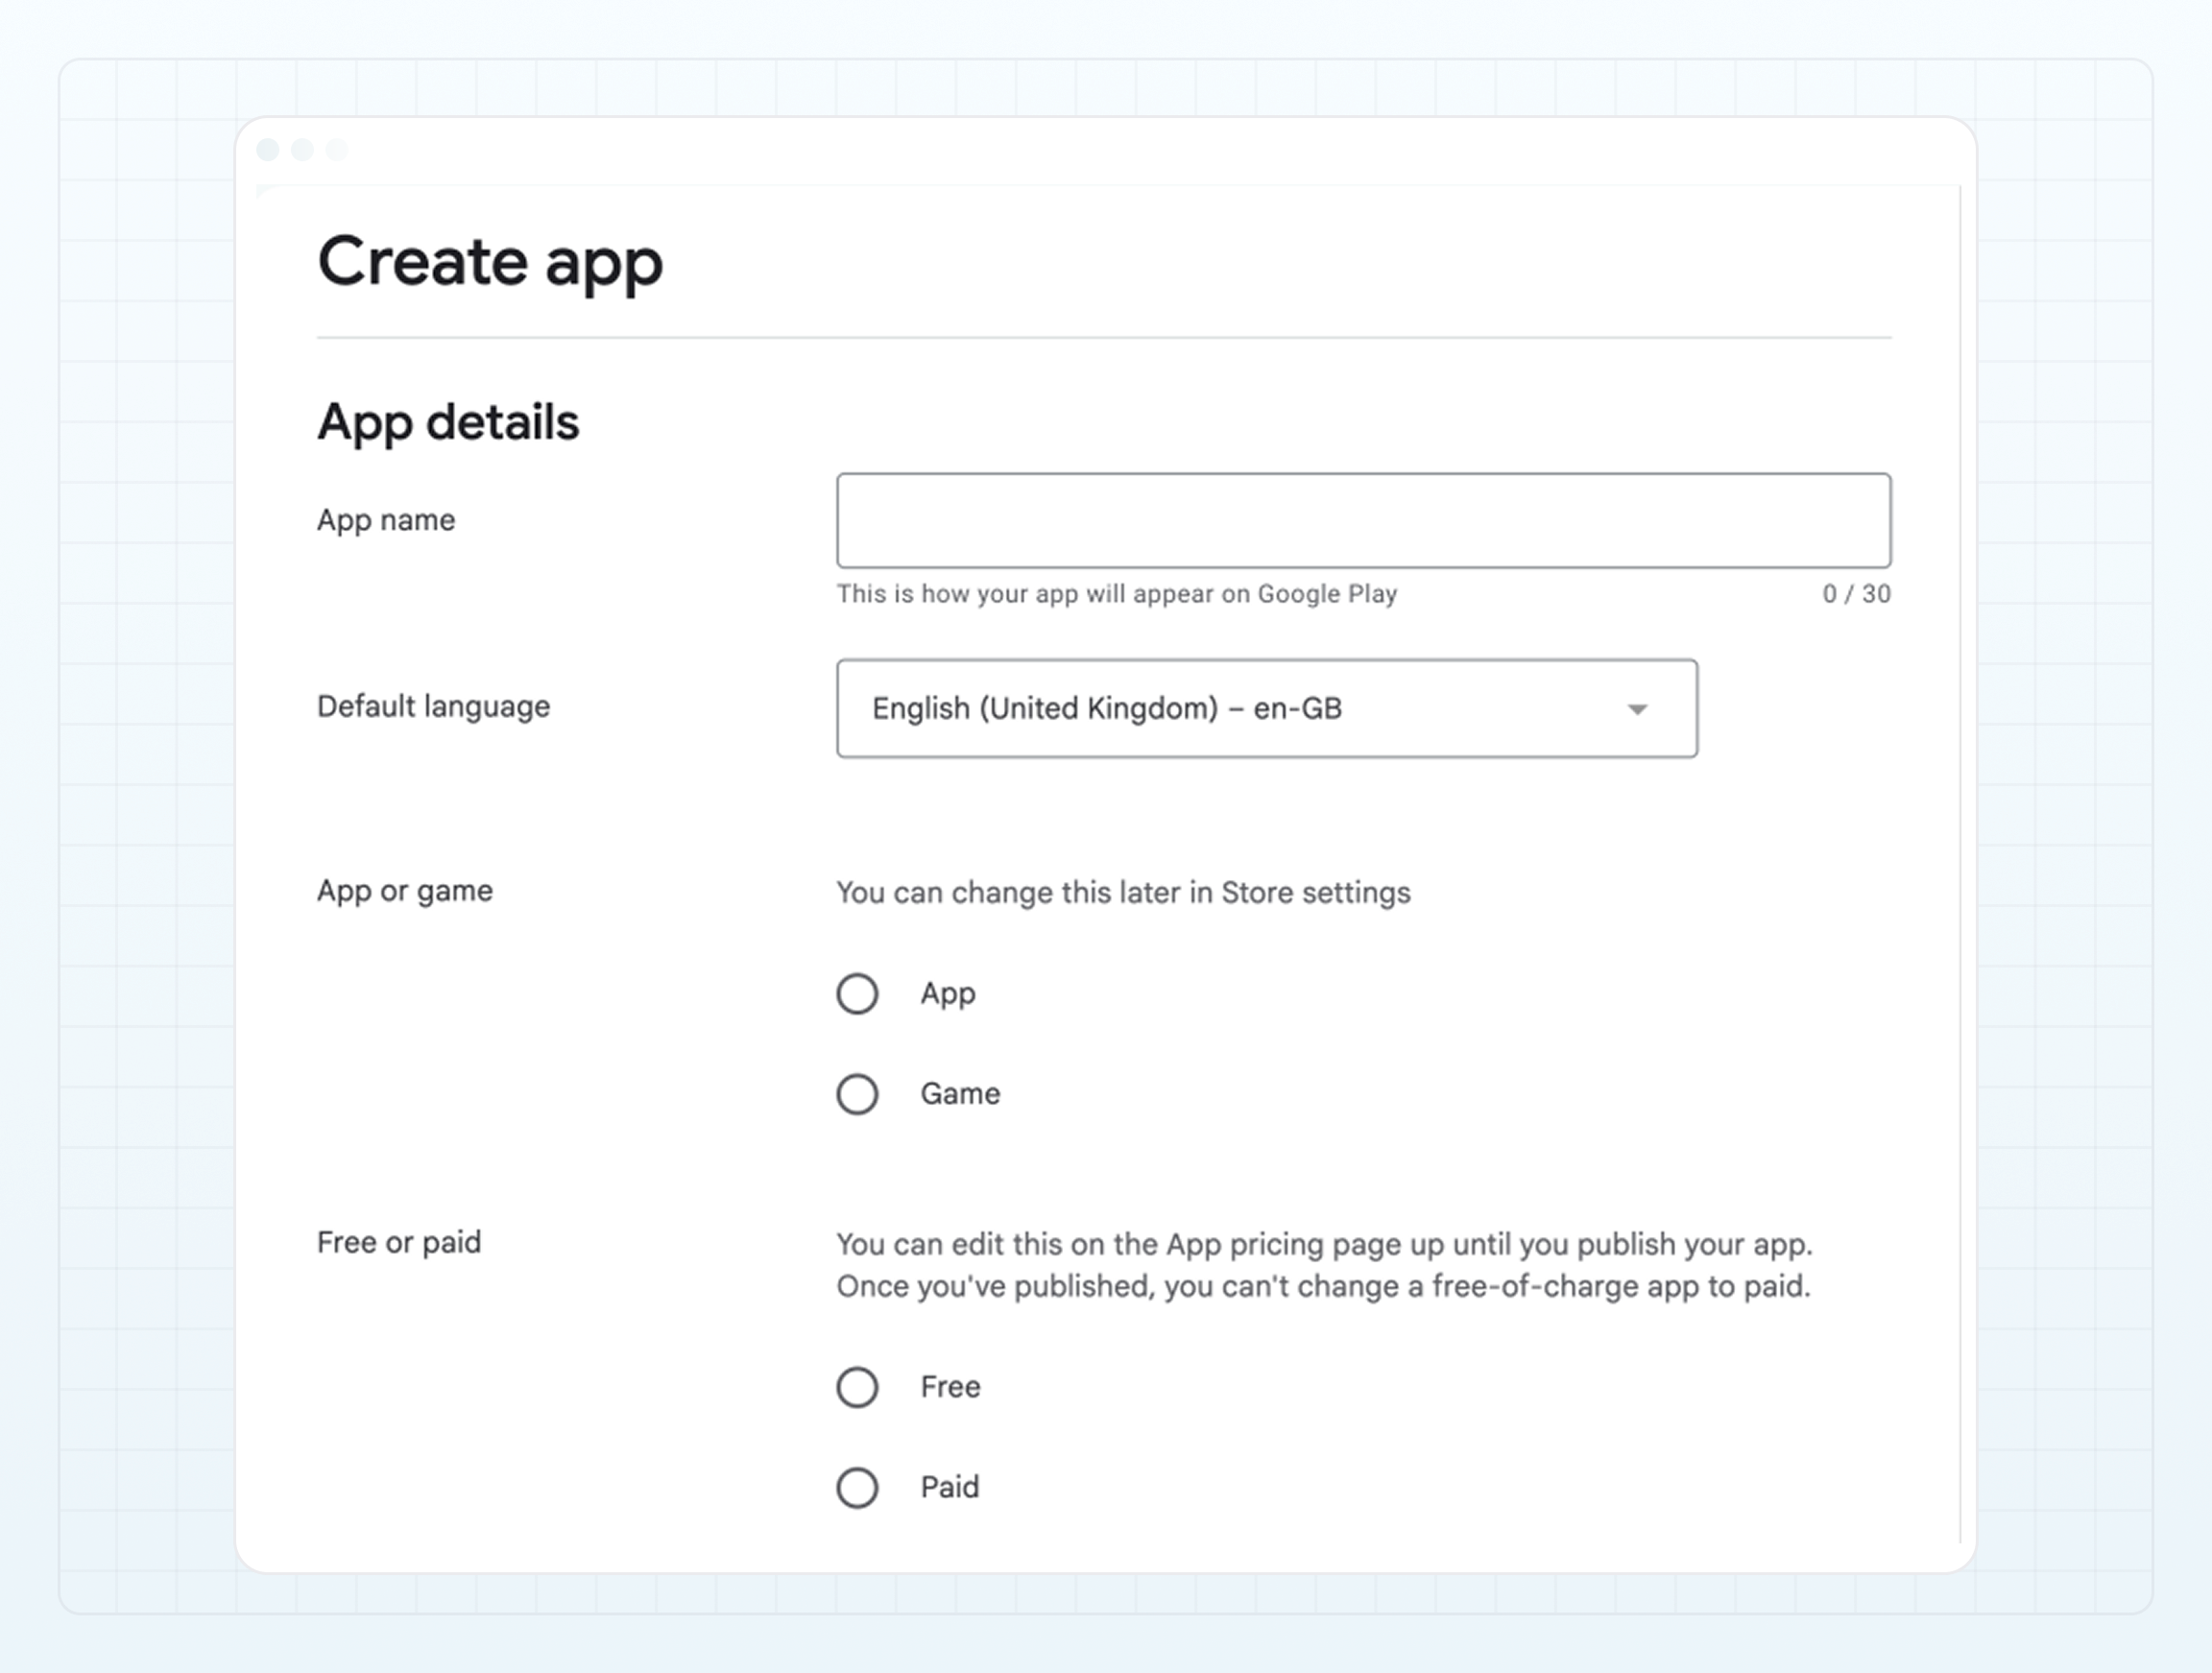
Fill in the app details:
- In the App name field, enter the name for your app. This is how your app will appear on Google Play.
- In the Default language dropdown, select English.
- In the App or game section, select App.
- In the Free or paid section, select Free.
Add an email address that Google Play users can use to contact you about your app.
In the Declarations section, accept app developer declarations and confirm policy compliance.
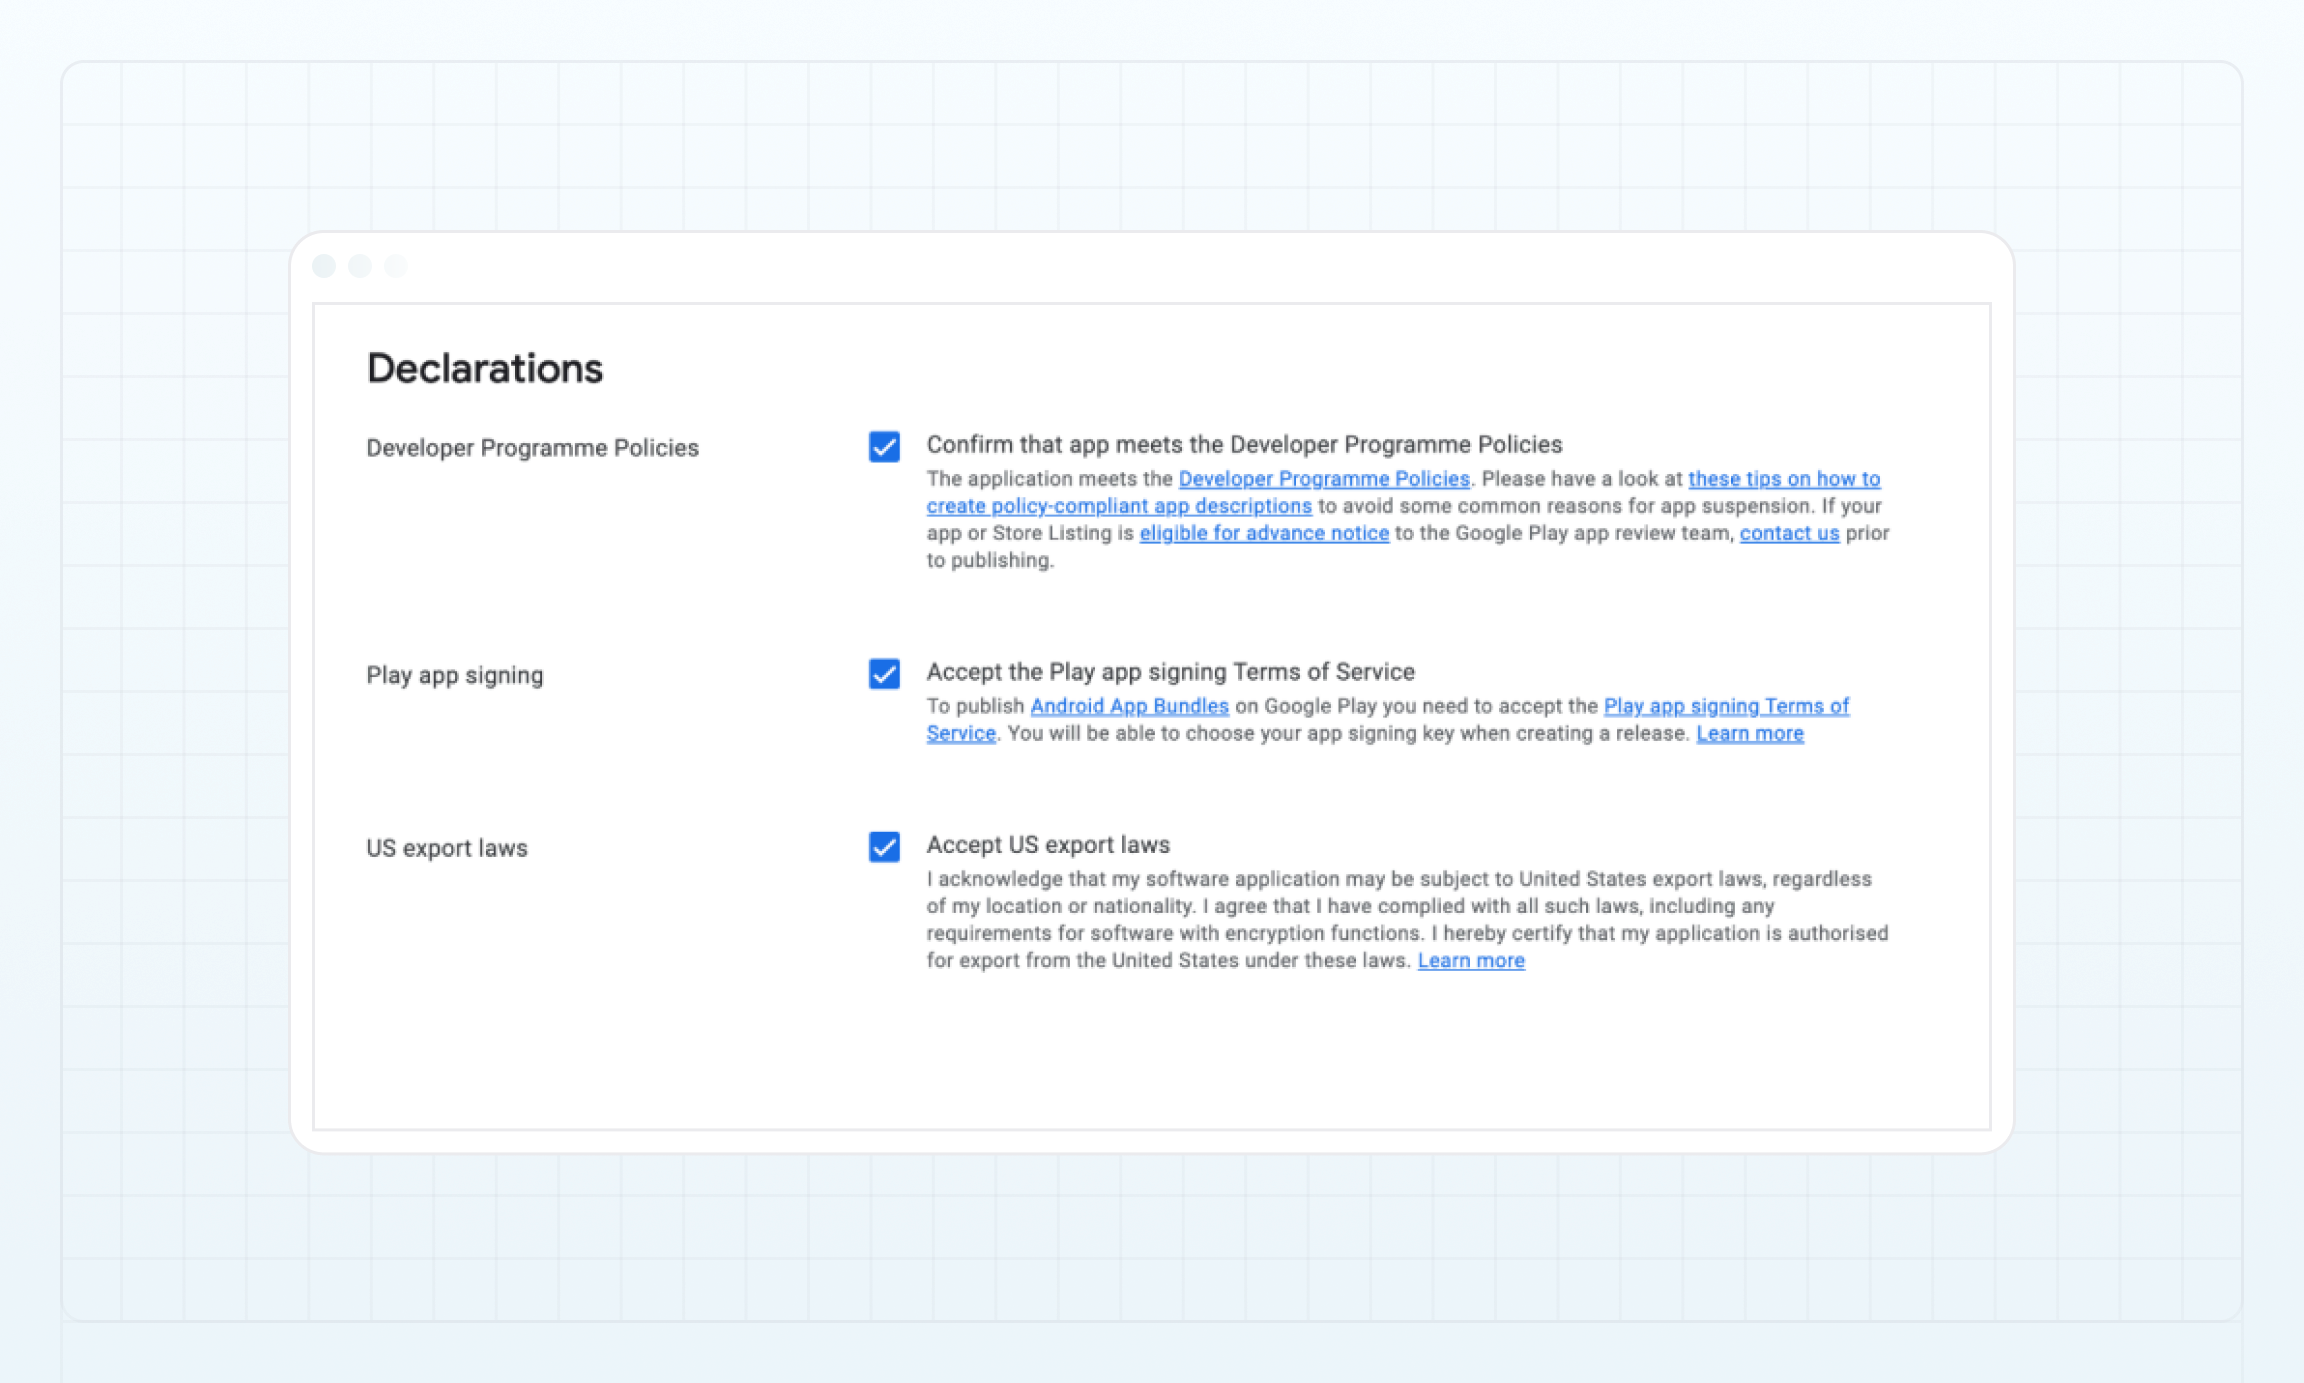
Click Create app.
After creating the app, you'll be redirected to the Dashboard to continue the app setup. If you’re not automatically redirected, you can access it anytime from the Home menu in the Play Console by clicking your app.
Step 6. Set up your app on the Play Console Dashboard
At this step, provide all the information requested by Google Play about your app.
To provide information about the app:
In the Play Console, select your app.
Click each link in the Set up your app section of the Dashboard and fill in the required details.
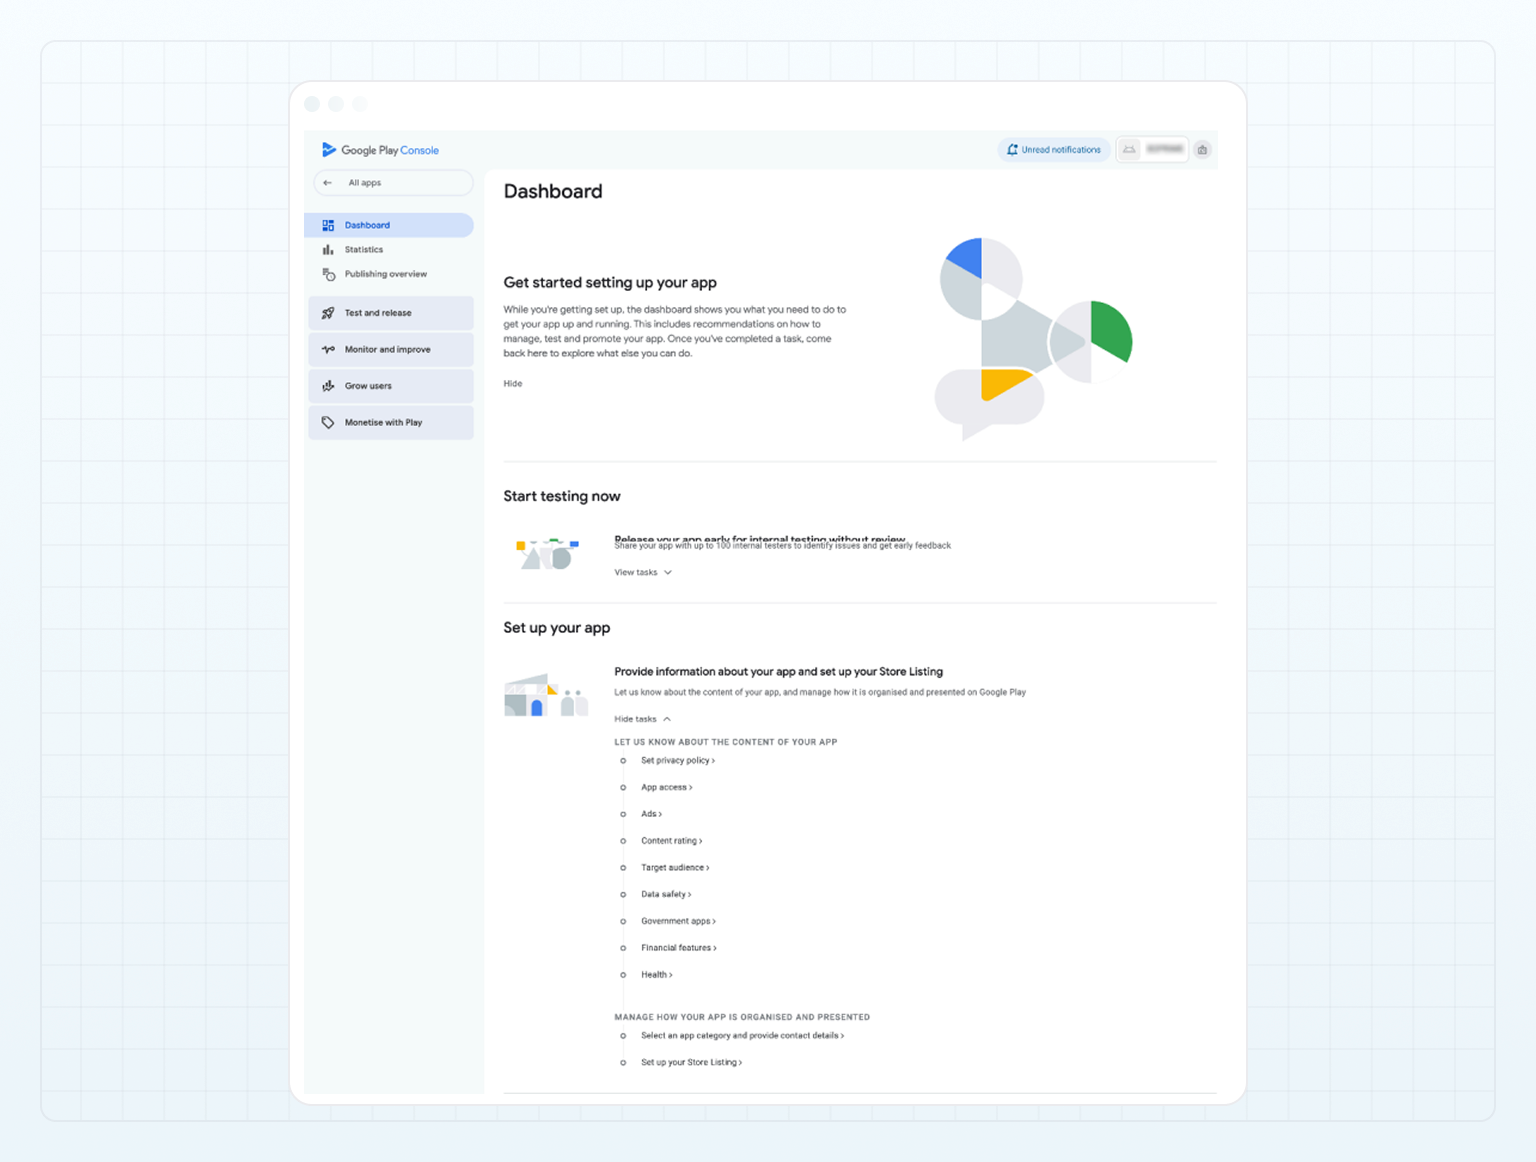
Set privacy policy
-
In this section, enter a link to your privacy policy that explains how you handle sensitive user and device data.
-
Click Save to return to the Dashboard.
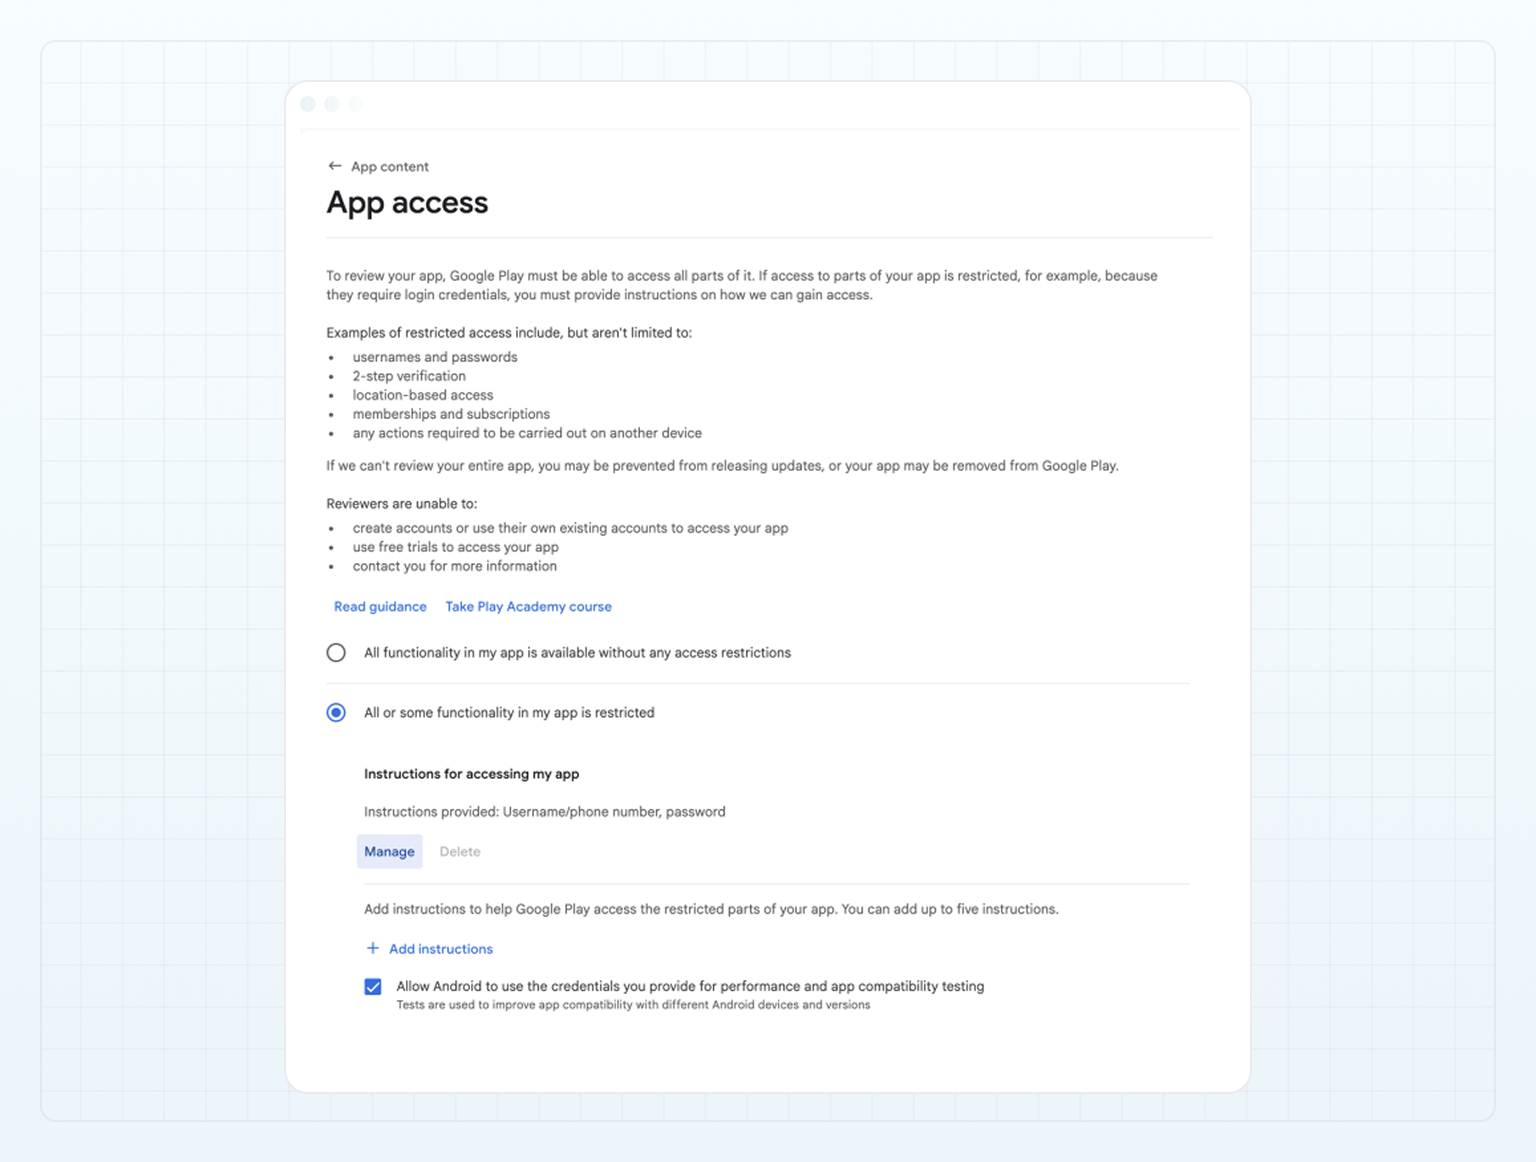
Ads
- In this section, select the option No, my app does not contain ads.
- Click Save to return to the Dashboard.
Content ratings
-
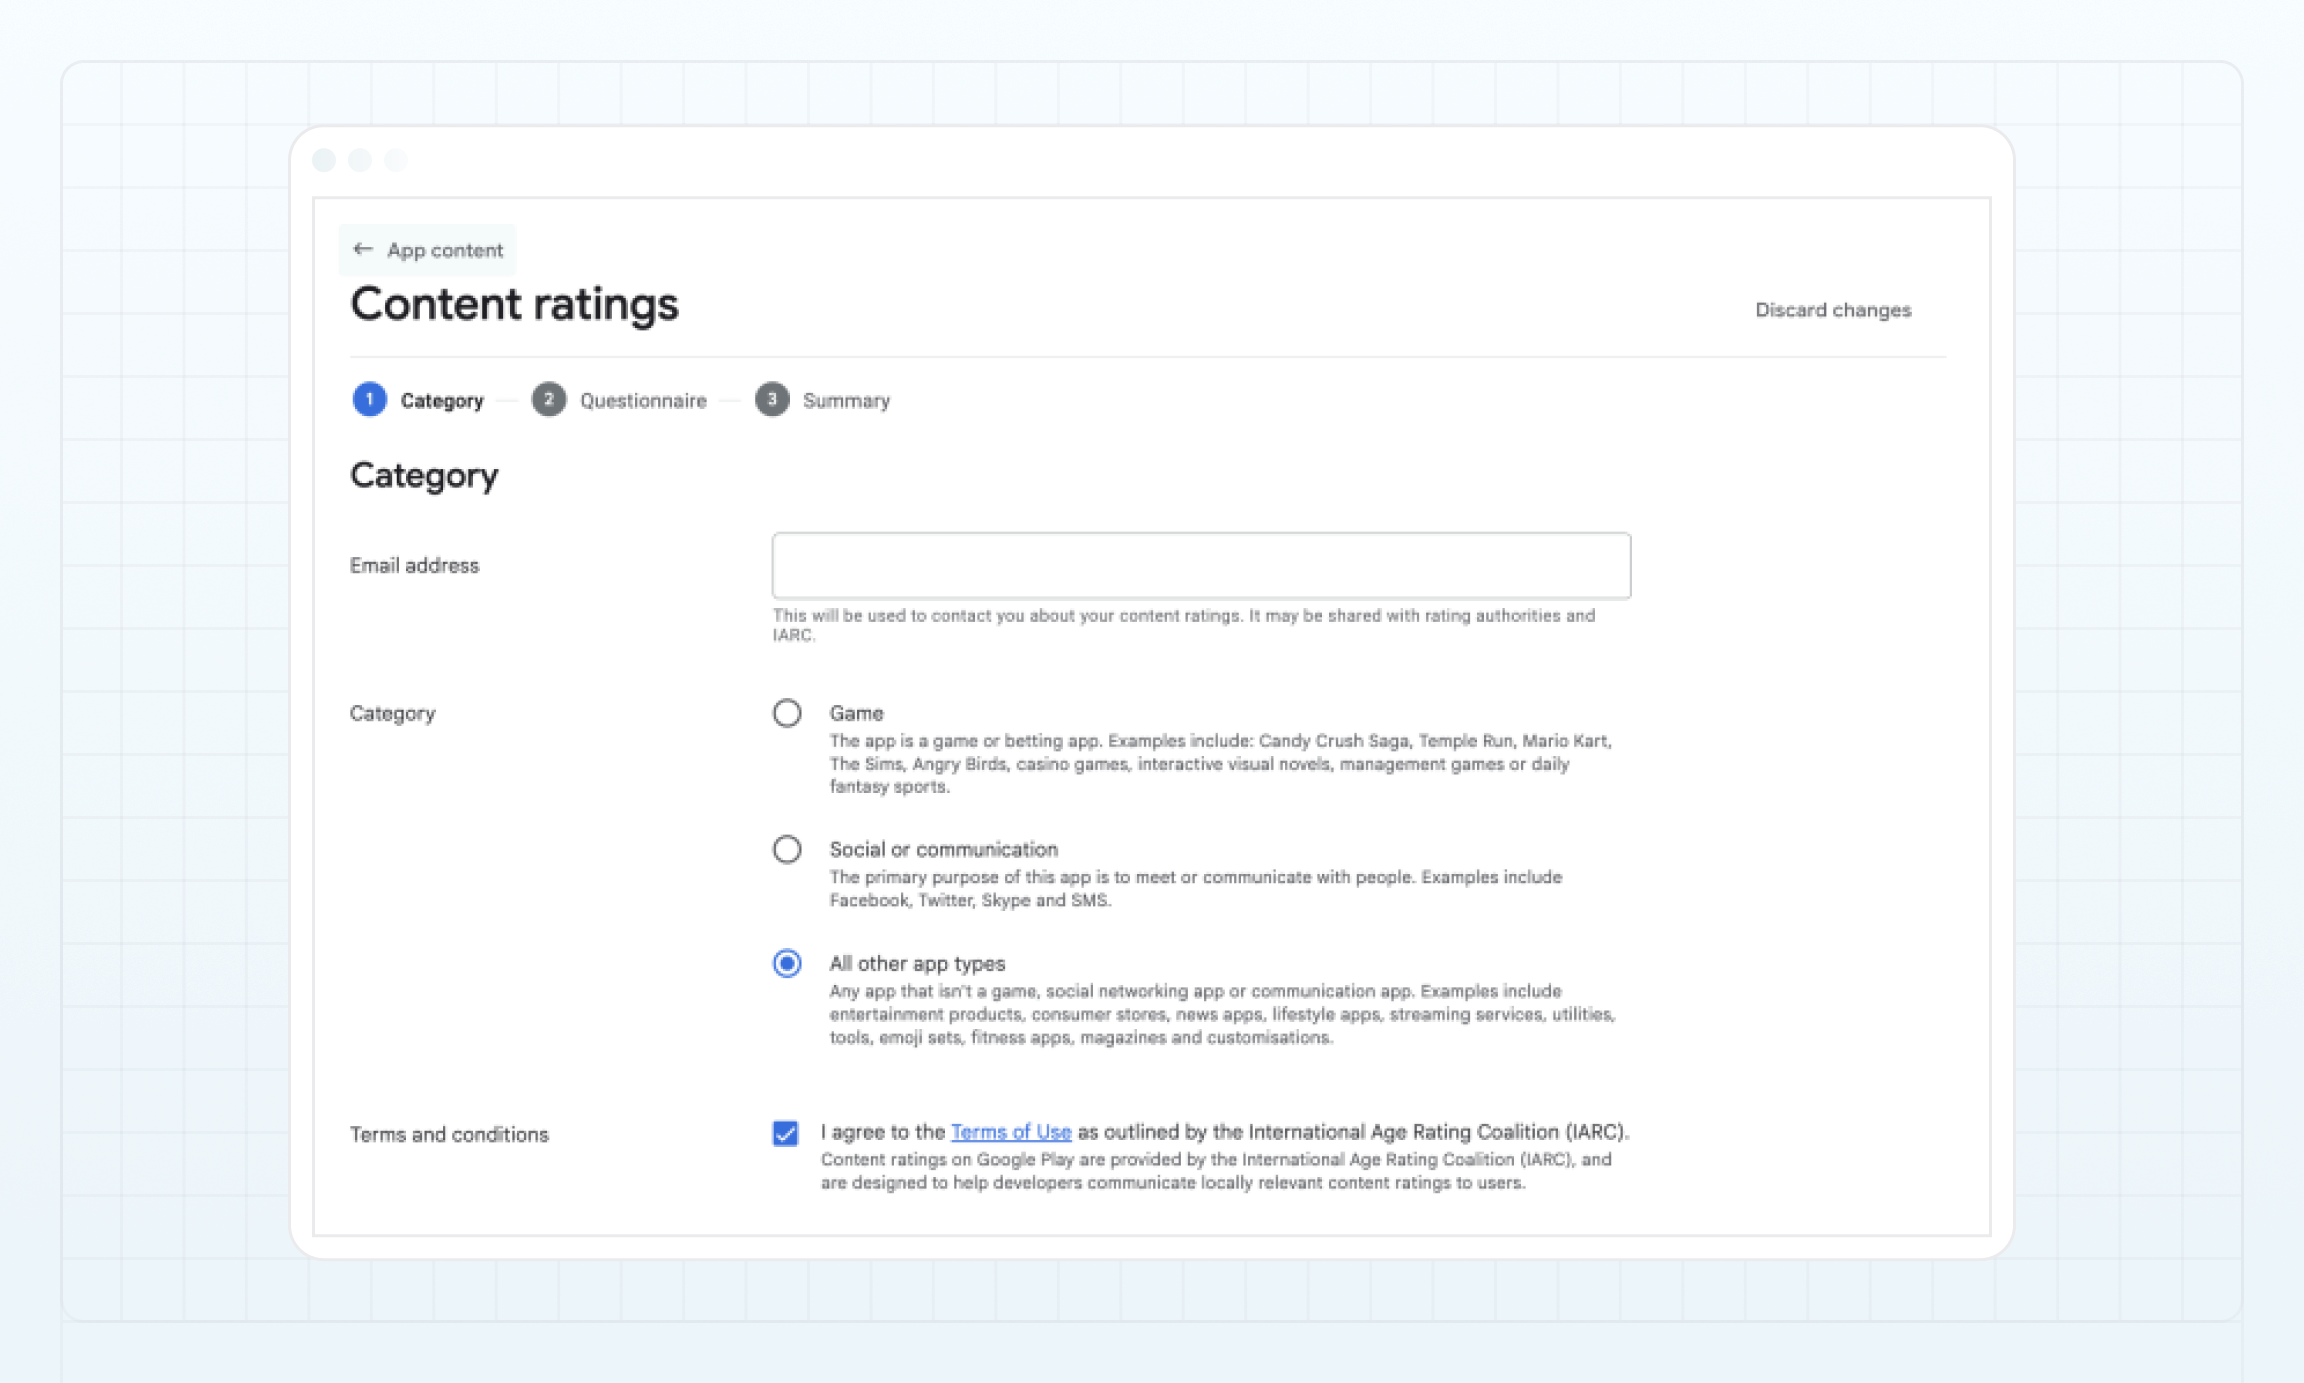
In the Category section, fill in the following:
- Email address — specify your contact email.
- Select the option All other app types.
- Enable the checkbox to Agree with the Terms of Use.
-
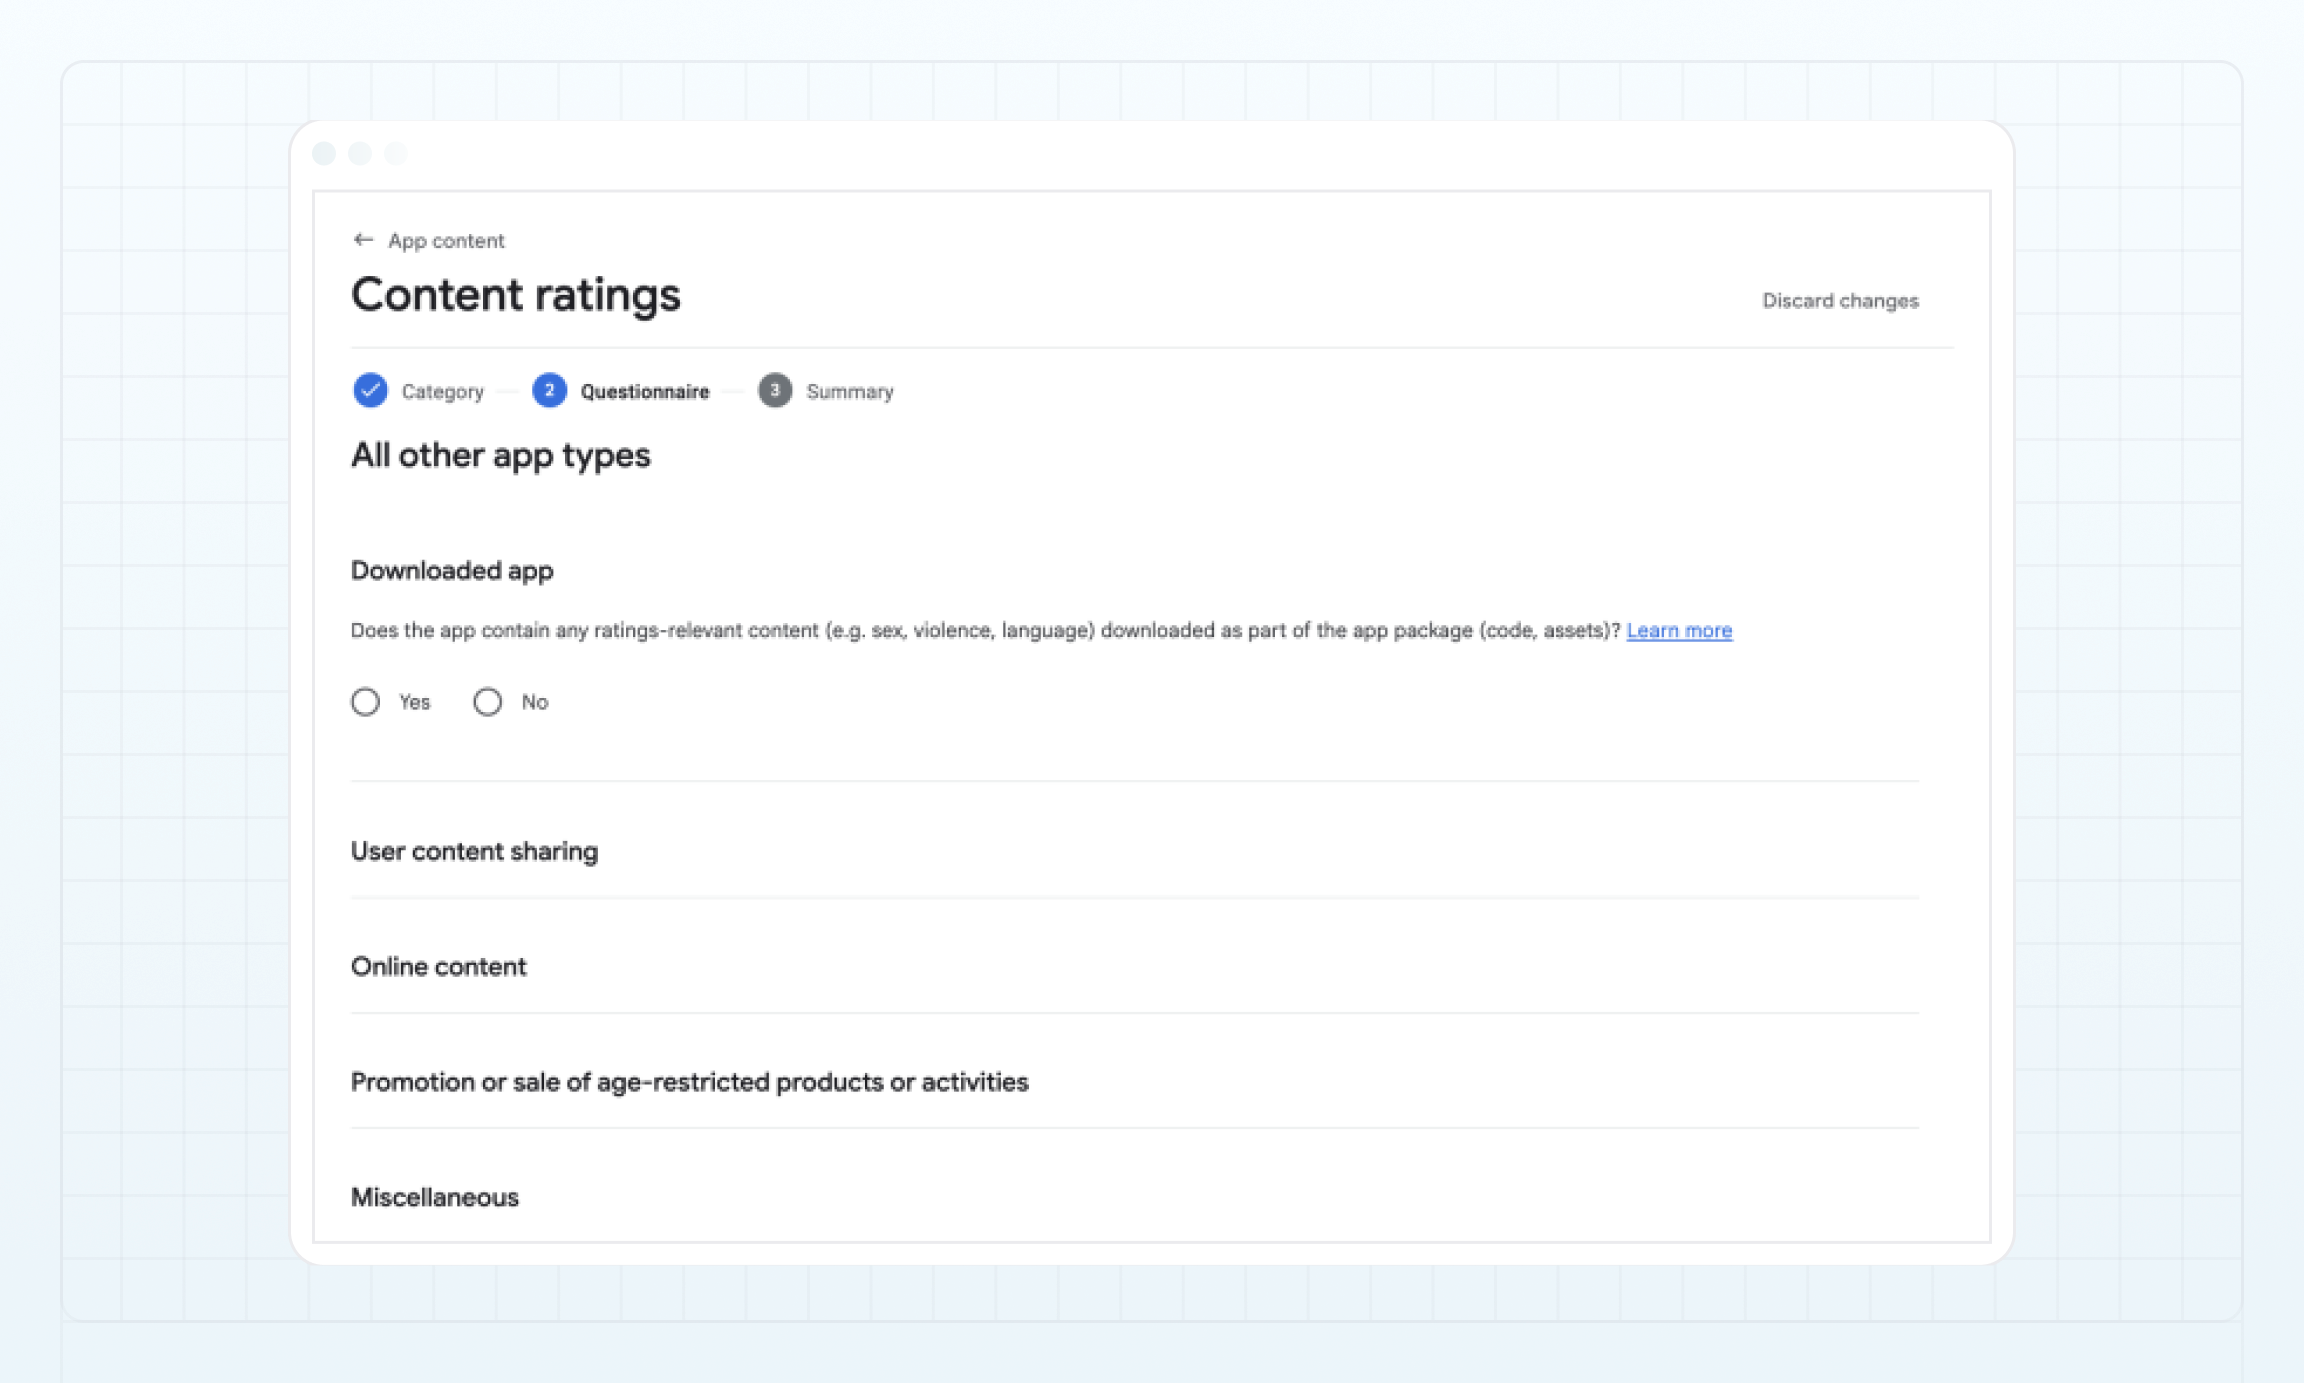
In the Questionnaire section, select No for all the following:
- Downloaded app
- User content sharing
- Online content
- Promotion or sale of age-restricted products or activities
- Miscellaneous
- In the Summary section, verify the displayed summary and click Save.
Target audience and content
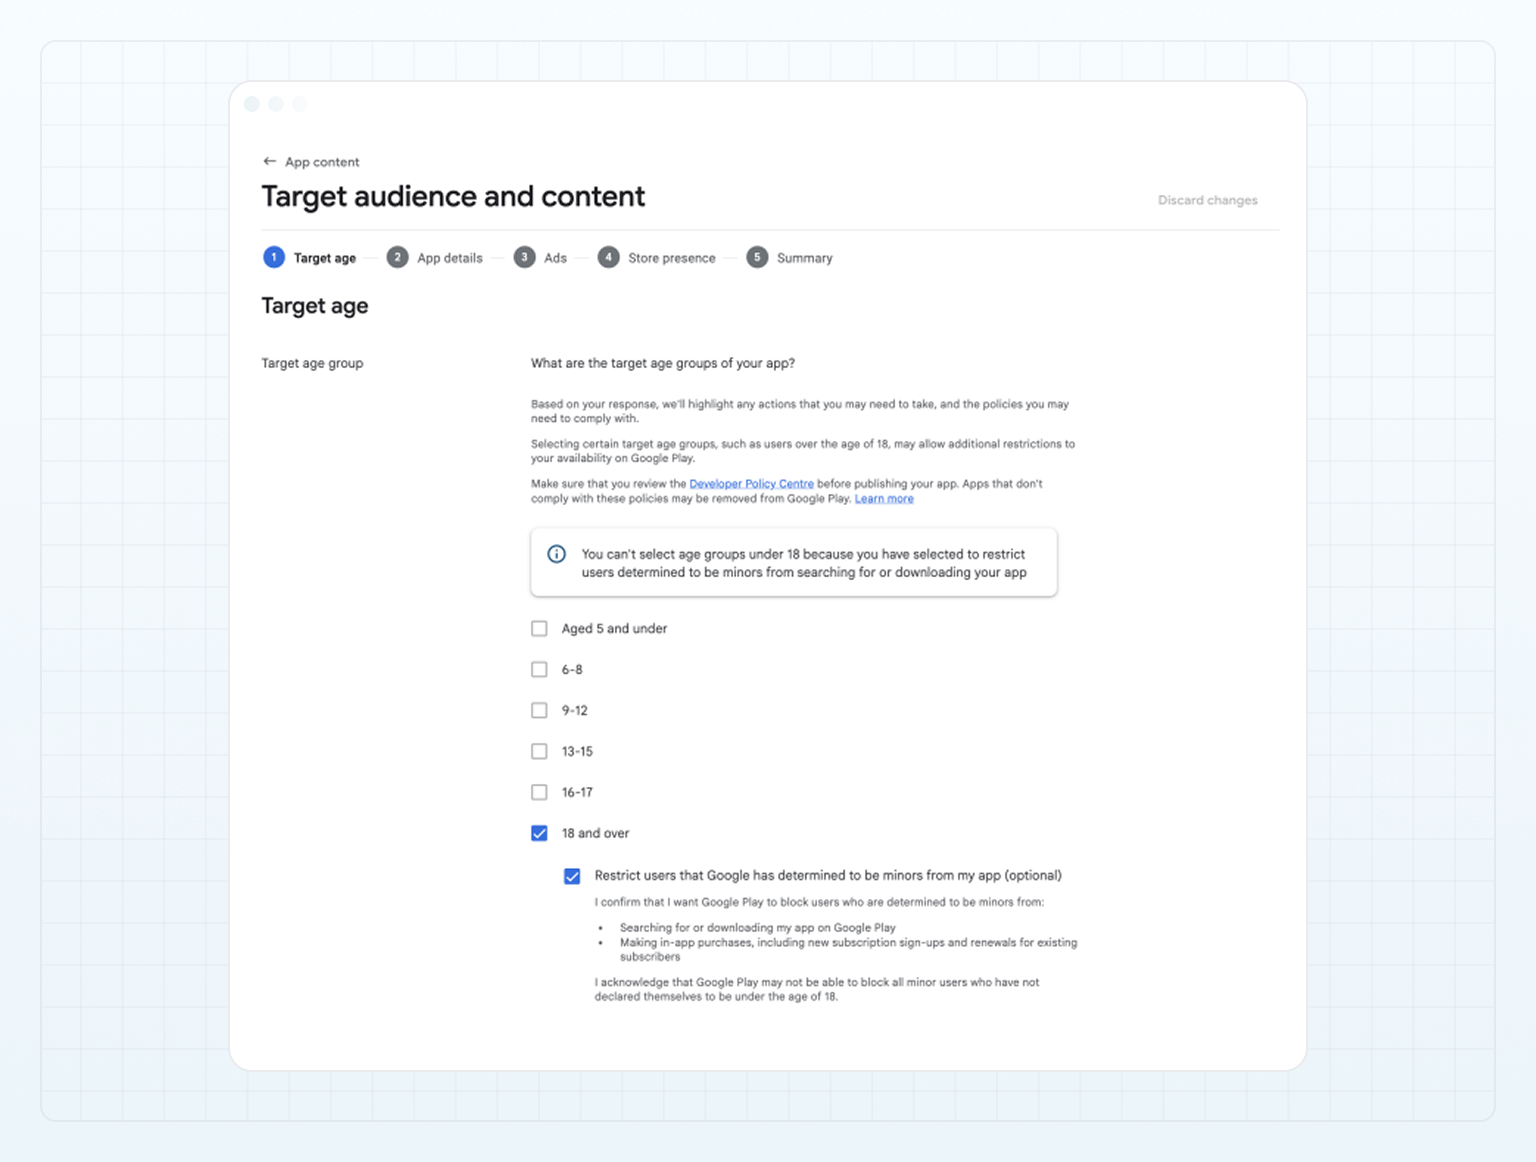
- In the Target audience, select the checkbox 18 and over. Selecting this checkbox will redirect you to the Summary section.
- You can fill in the previous sections, such as App details, Ads, and Store presence if necessary.
- In the Summary section, verify the displayed summary and click Save.
Data safety
- Read the Overview section.
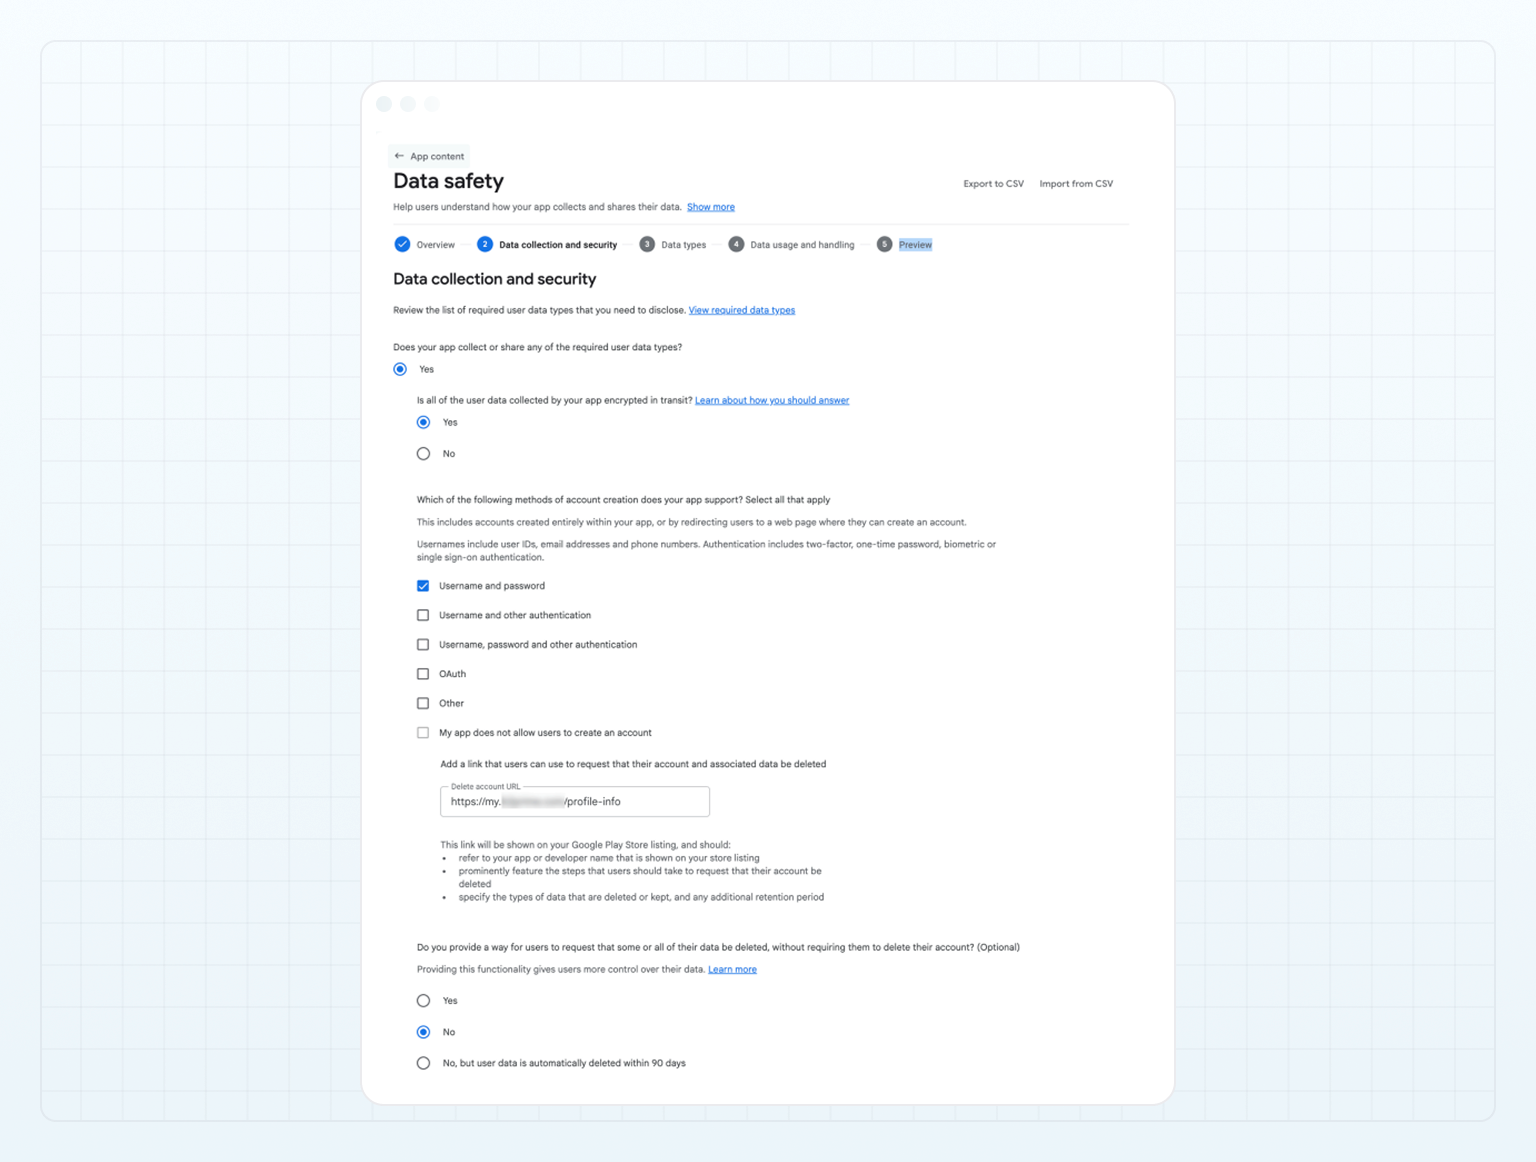
- In the Data collection and security section, select the options as shown below and provide a URL to the section in your B2CORE UI where an account can be deleted. The URL must follow this format:
https://{your-Front-Office-URL}/profile-info
Make sure to replace {your-Front-Office-URL} with the domain of your B2CORE UI.
Ensure that your B2CORE instance supports account deletion. This is a Google Play requirement and may be checked at any time by Google Play or by users. Failure to comply may result in suspension of your developer account in Google Play Console or a permanent ban.
-
In the Data types section, fill in the following:
- Location: B2CORE does not collect this type of data.
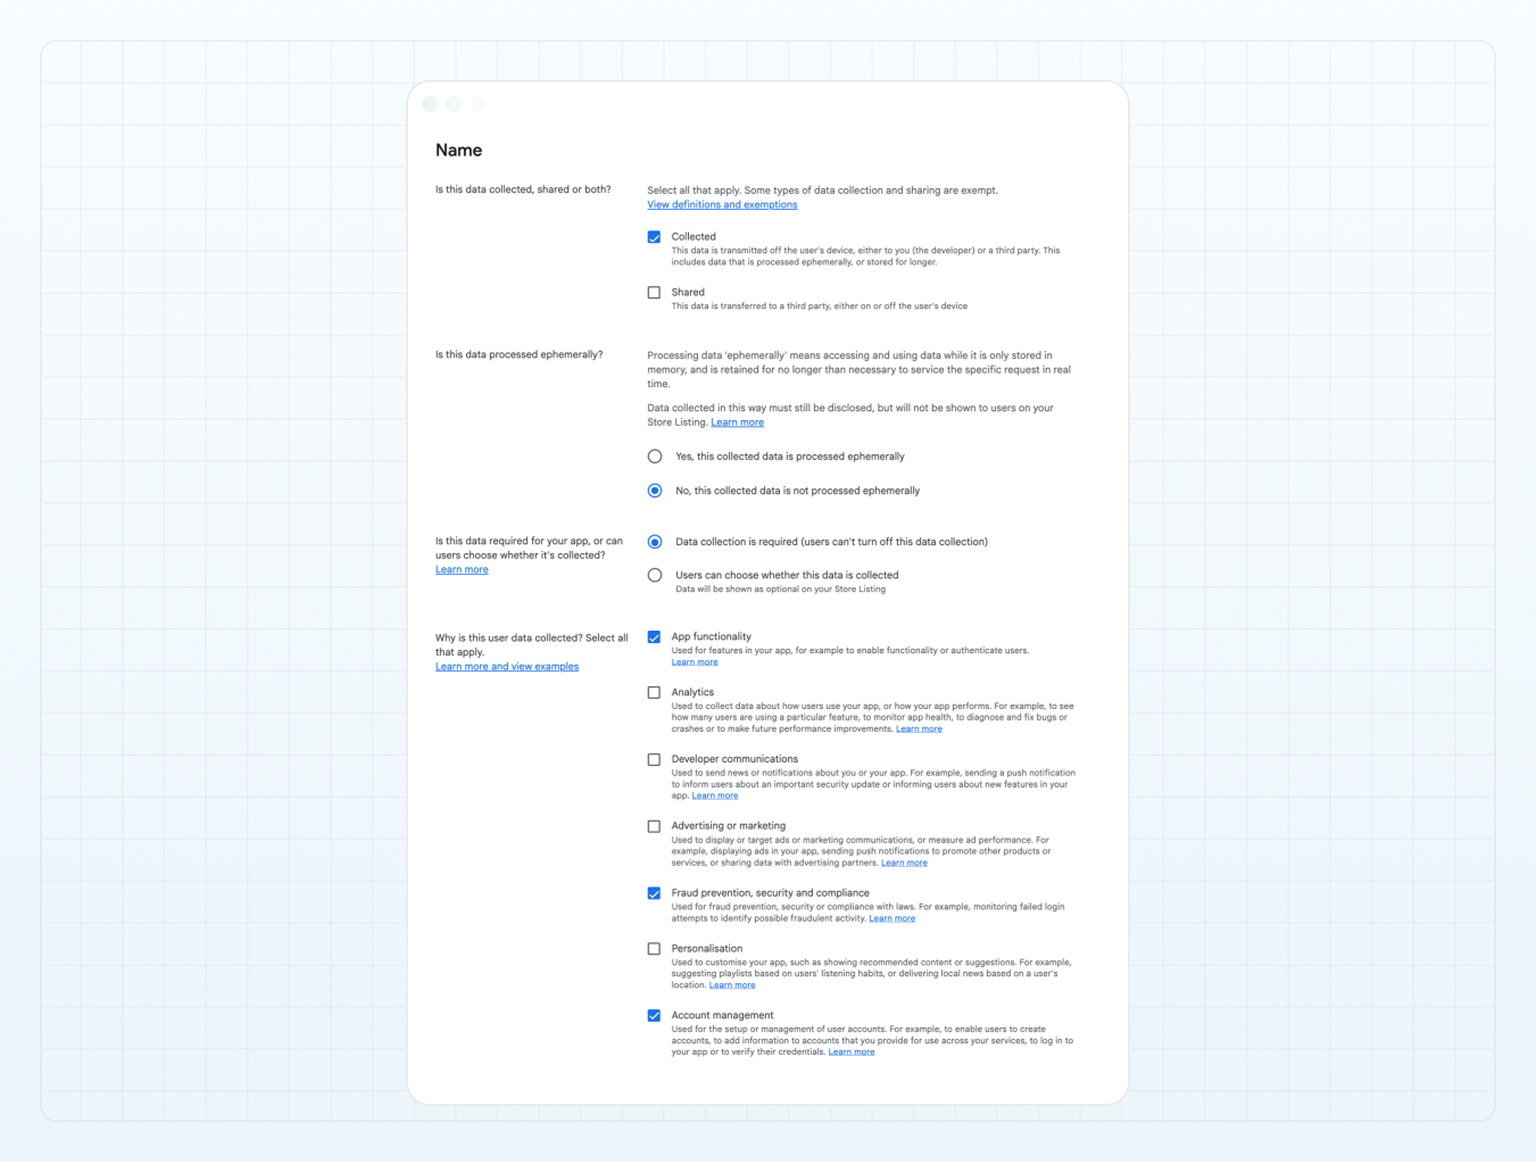
- Personal info: Specify the data that clients are required to provide during registration in your B2CORE instance. This usually includes (but isn't limited to) "Name", "Email address", "Phone number", or other.
- Financial info: B2CORE does not collect this type of data.
- Health and fitness: B2CORE does not collect this type of data.
- Messages: B2CORE does not collect this type of data.
- Photos and videos: B2CORE does not collect this type of data.
- Audio files: B2CORE does not collect this type of data.
- Files and docs: B2CORE does not collect this type of data.
- Calendar: B2CORE does not collect this type of data.
- Contacts: B2CORE does not collect this type of data.
- App activity: B2CORE collects "App interactions" data.
- Web browsing: B2CORE does not collect this type of data.
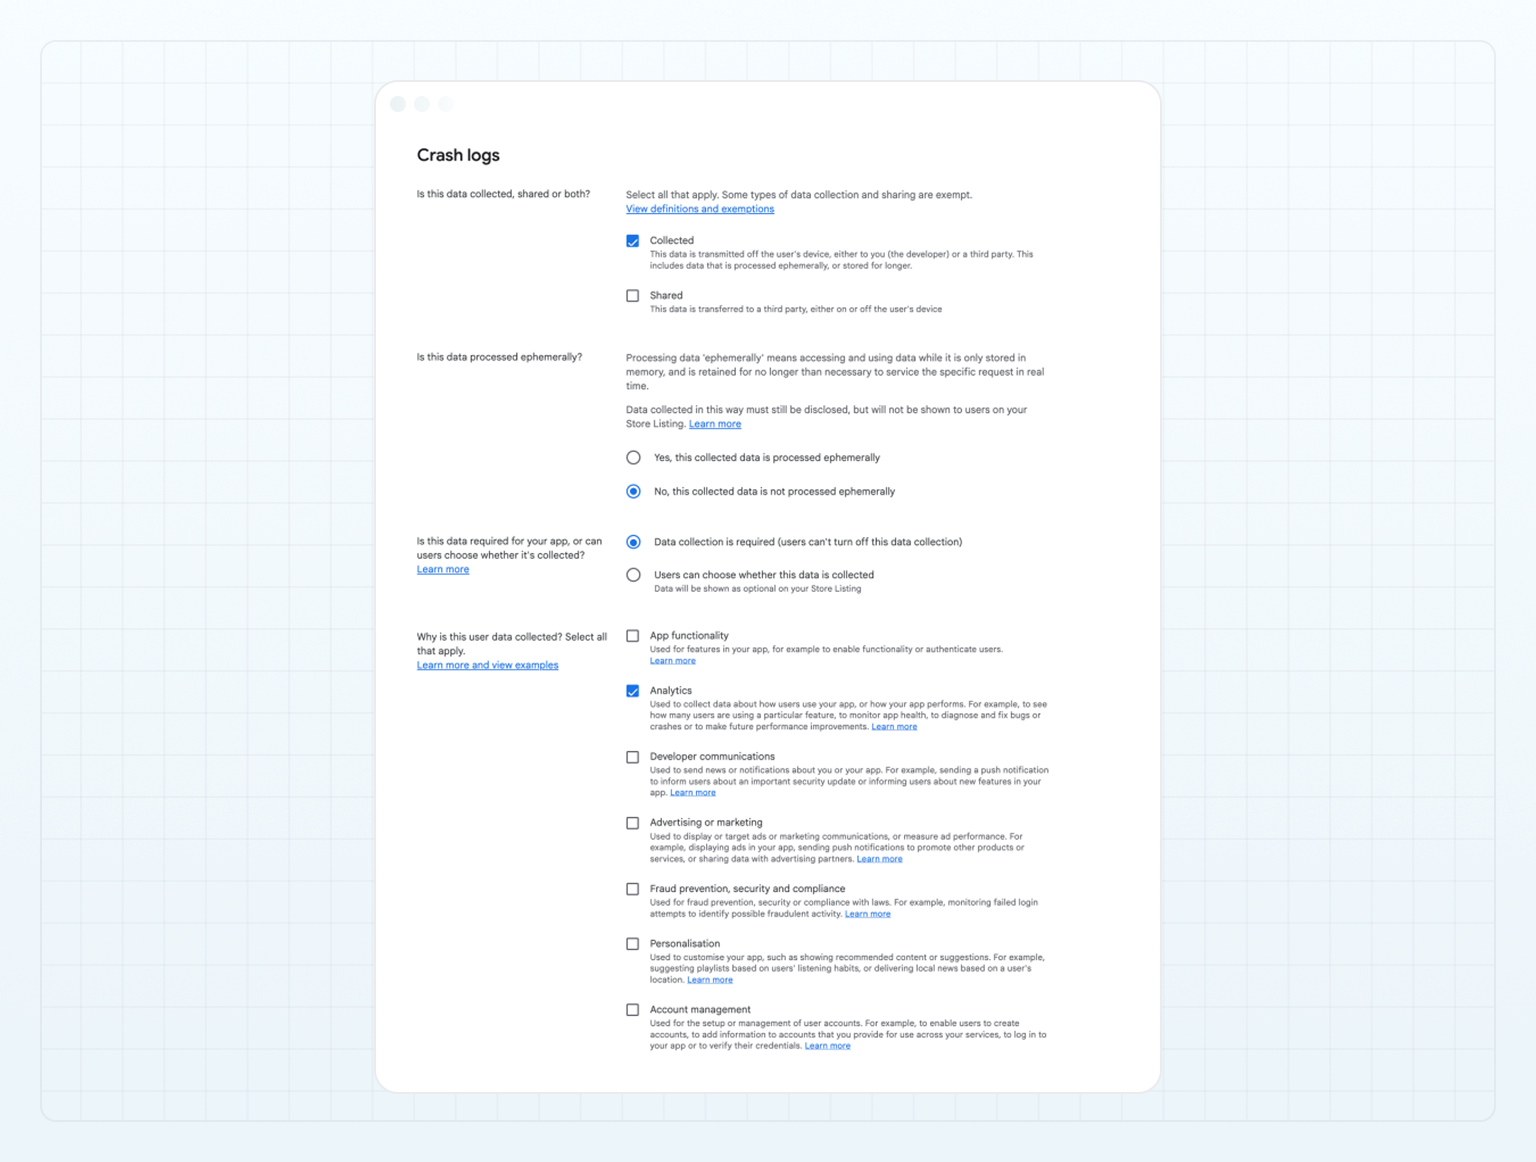
- App info and performance: B2CORE collects "Crash logs" and "Diagnostics" data.
- Device or other IDs: B2CORE does not collect this type of data.
-
In the Data usage and handling section, you will see a set of questionnaires related to the data collected by the app.
- Complete the questionnaires in the Personal info section as shown in the example below:
- Complete the questionnaires in the App info and performance and App activity sections as shown in the example below:
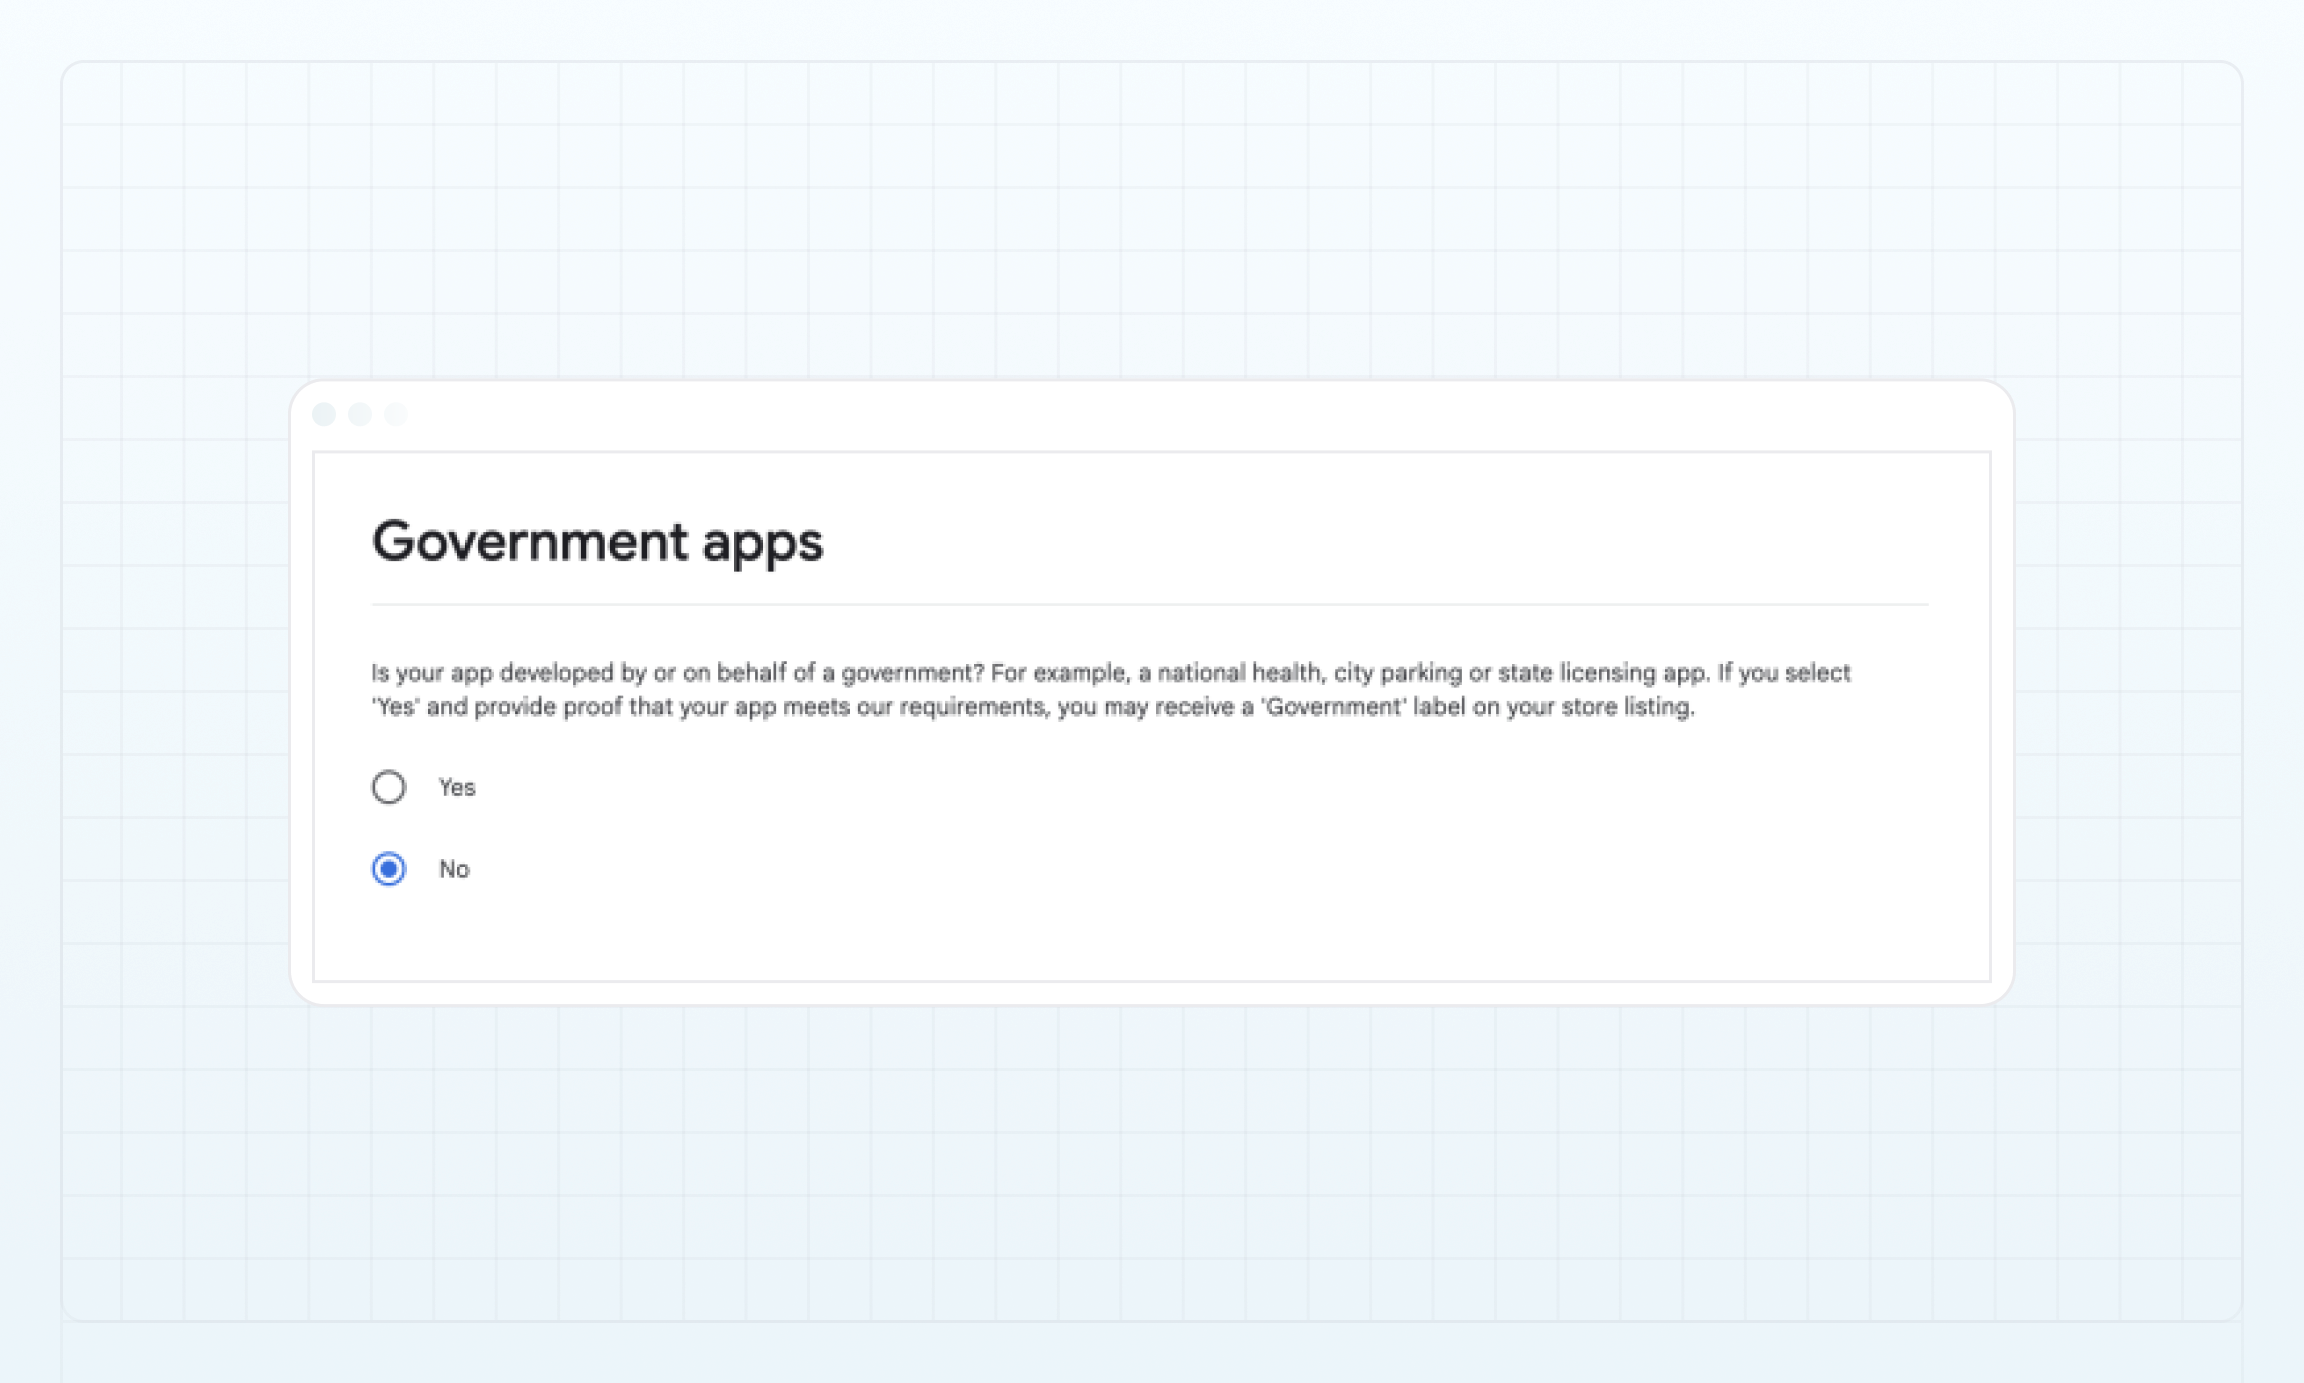
- In the Preview section, verify the displayed summary and click Save.
Financial features
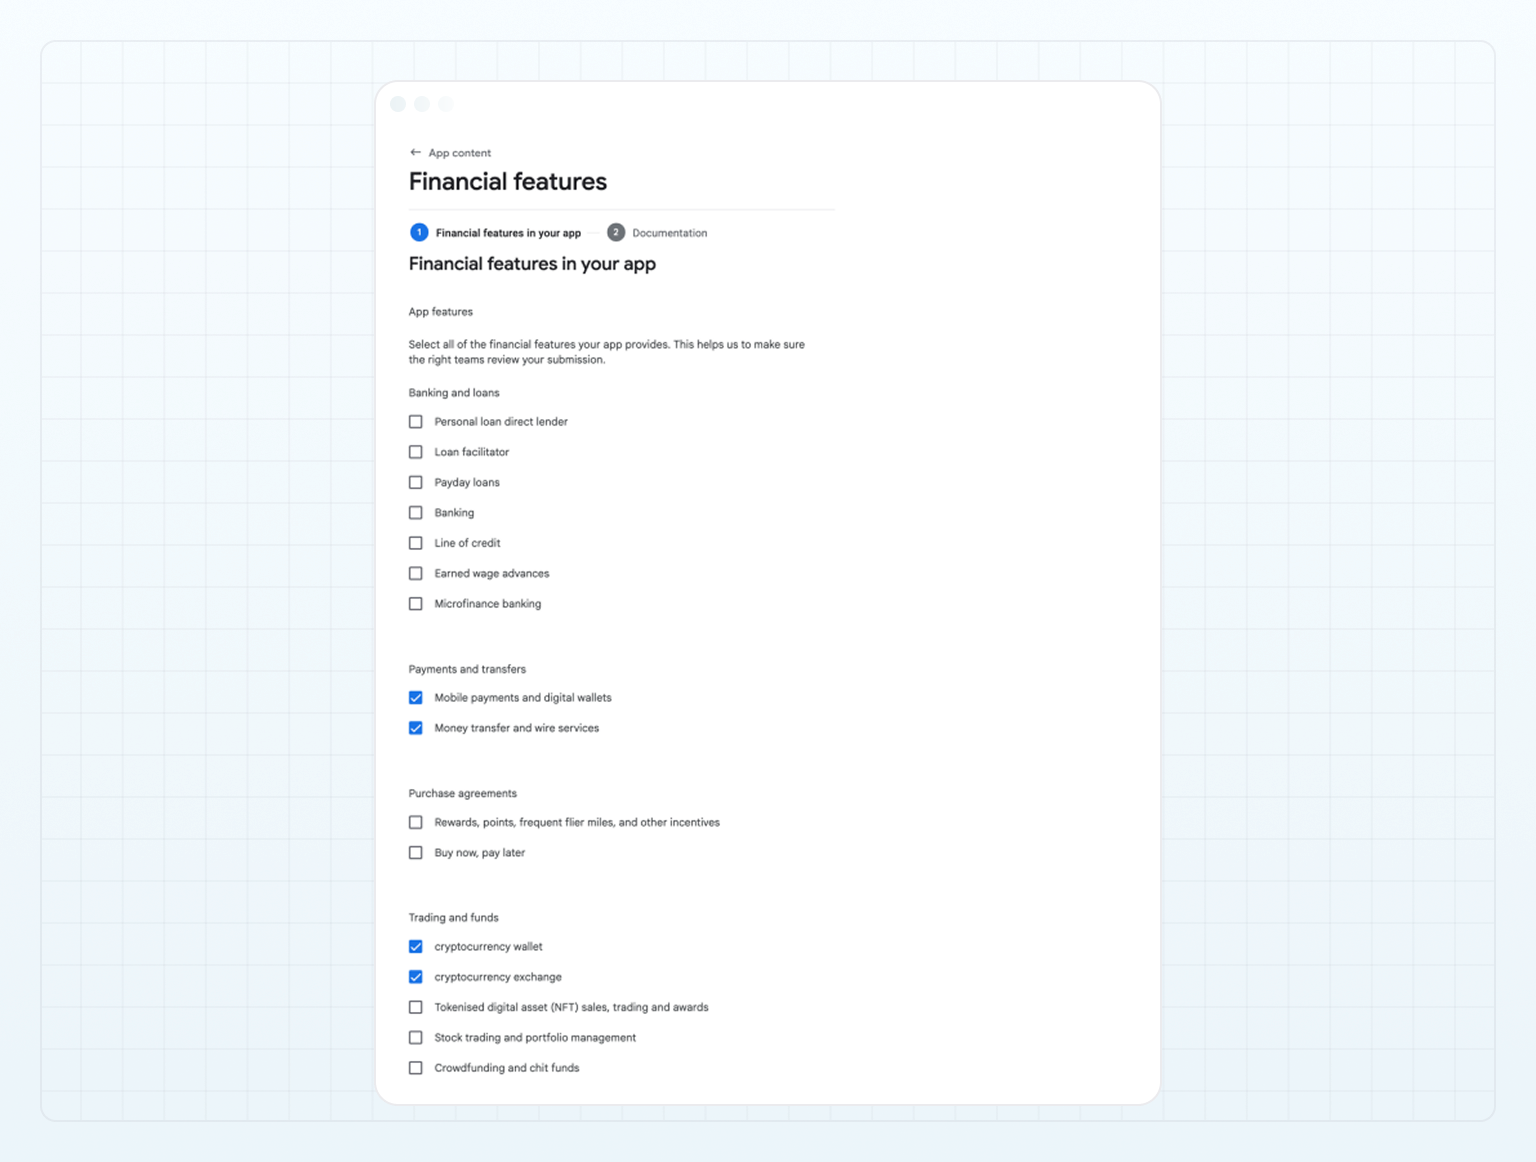
- Select the checkboxes for the features that your app provides.
Make sure to select only the features that your app actually provides. These may differ from the example shown below.
- Click Save to return to the Dashboard.
Health apps
- Select the option My app does not have any health features and click Next.
- The Documentation section doesn't require any additional actions.
- Click Save to return to the Dashboard.
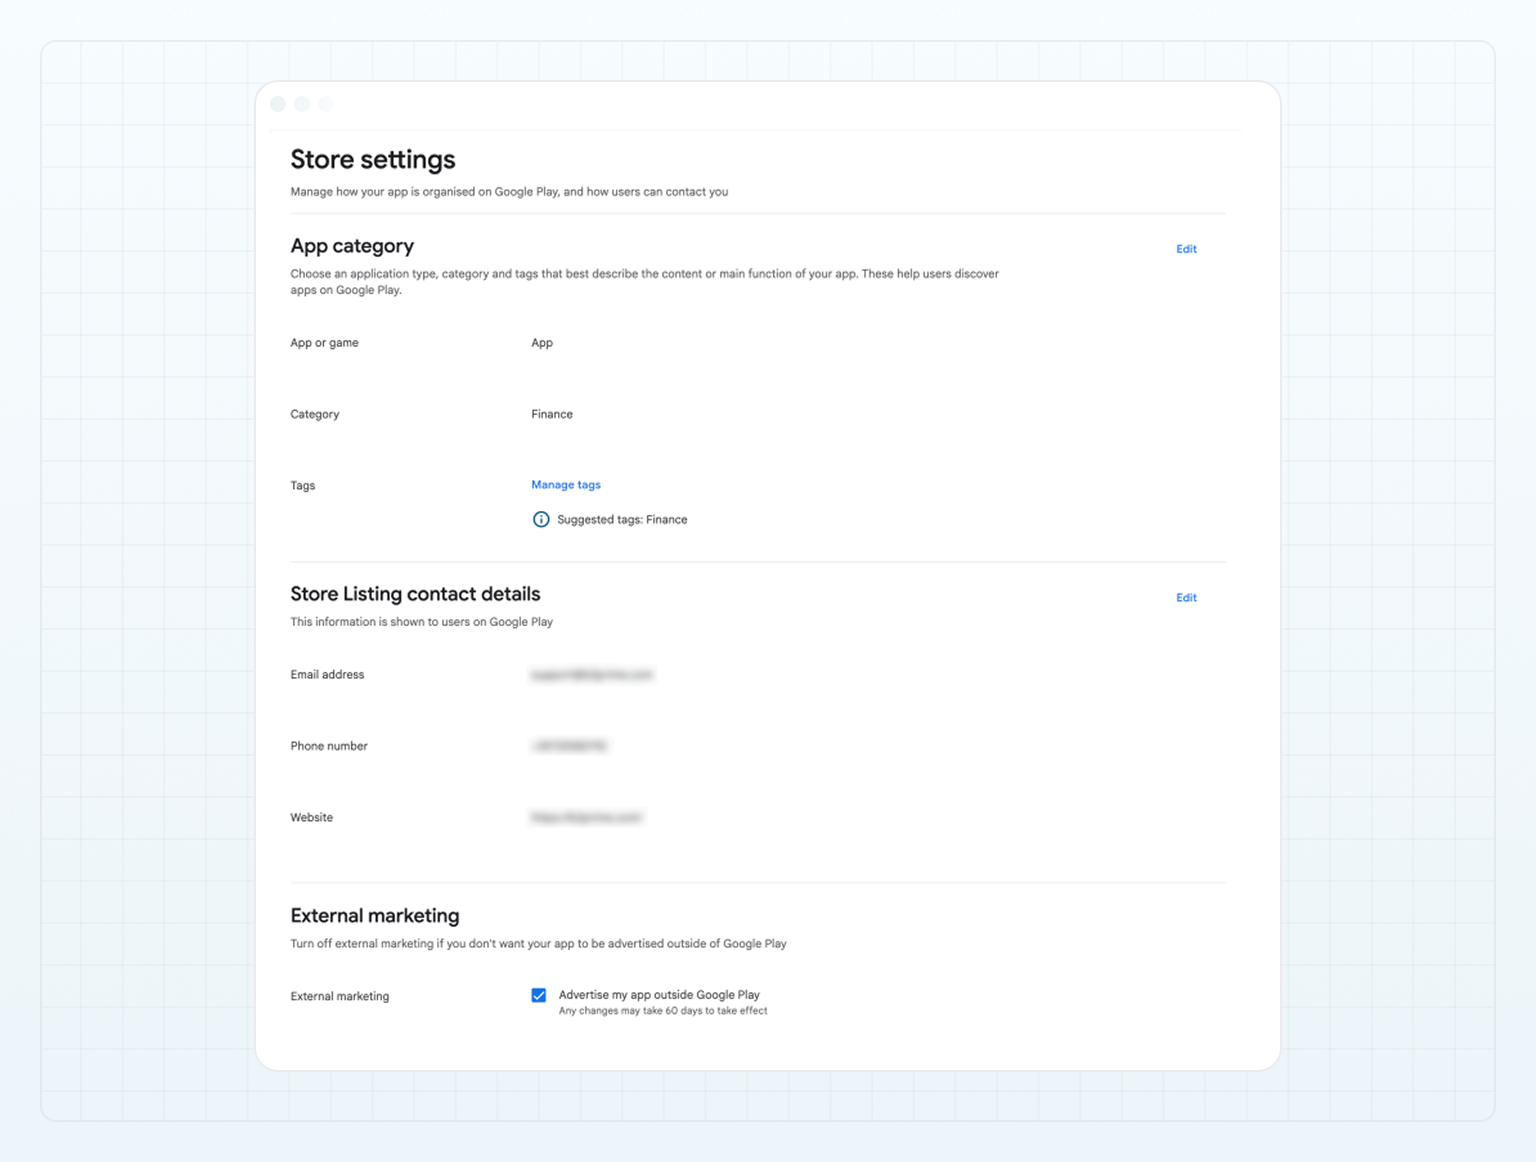
Store settings
-
In the App category section, fill in the following:
- In the App or Game option, select App.
- In the Category, select Finance.
-
In the Store Listing contact details section, enter the email address, phone number, and website that will be visible to users on Google Play.
-
(Optional) In the External marketing section, you can select the checkbox for Advertise my app outside Google Play.
Set up your store listing
-
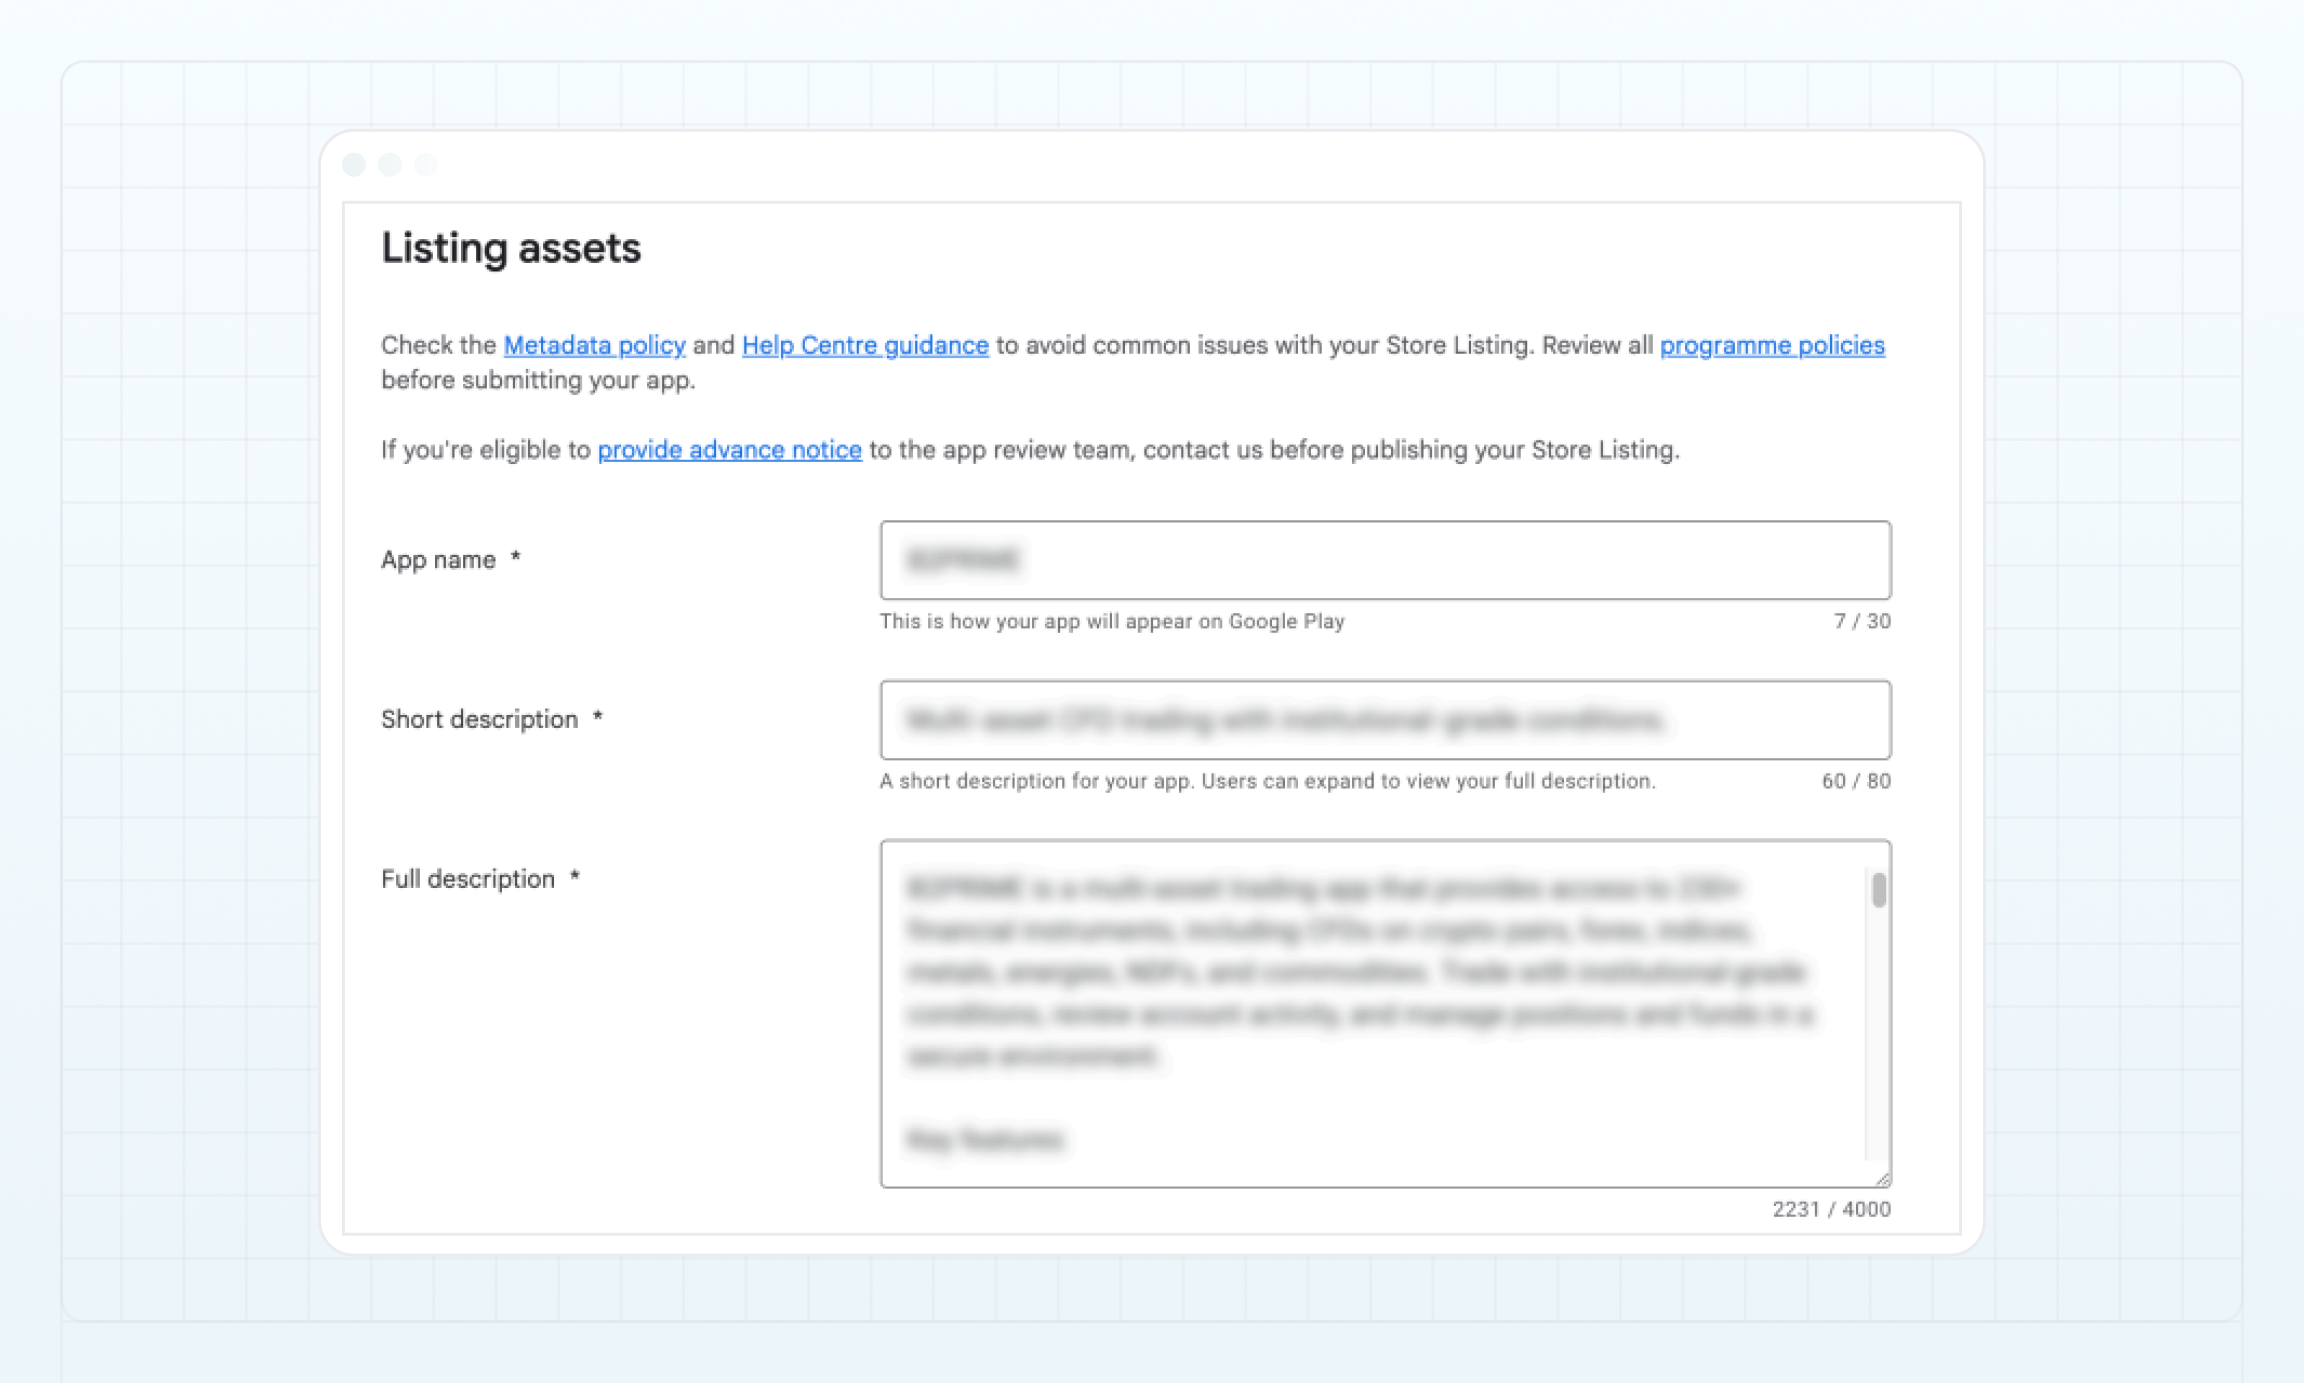
In the Listing assets section, fill in the following:
- App name
- Short description
- Full description
-
In the Graphics section, attach graphic assets provided by the B2CORE team. Click Add assets and upload each graphic asset one by one, and select the appropriate category for each asset.
-
After you’ve added all provided assets, click Save.
Send app information for review
All the information that you've provided about your app must be sent for Google review. Click Publishing overview in the main menu and then click Send X changes for review.
Step 7. Upload the app bundle (.aab) for a production release
To upload your app bundle and configure a production release in the Google Play Console:
In the Play Console, select your app.
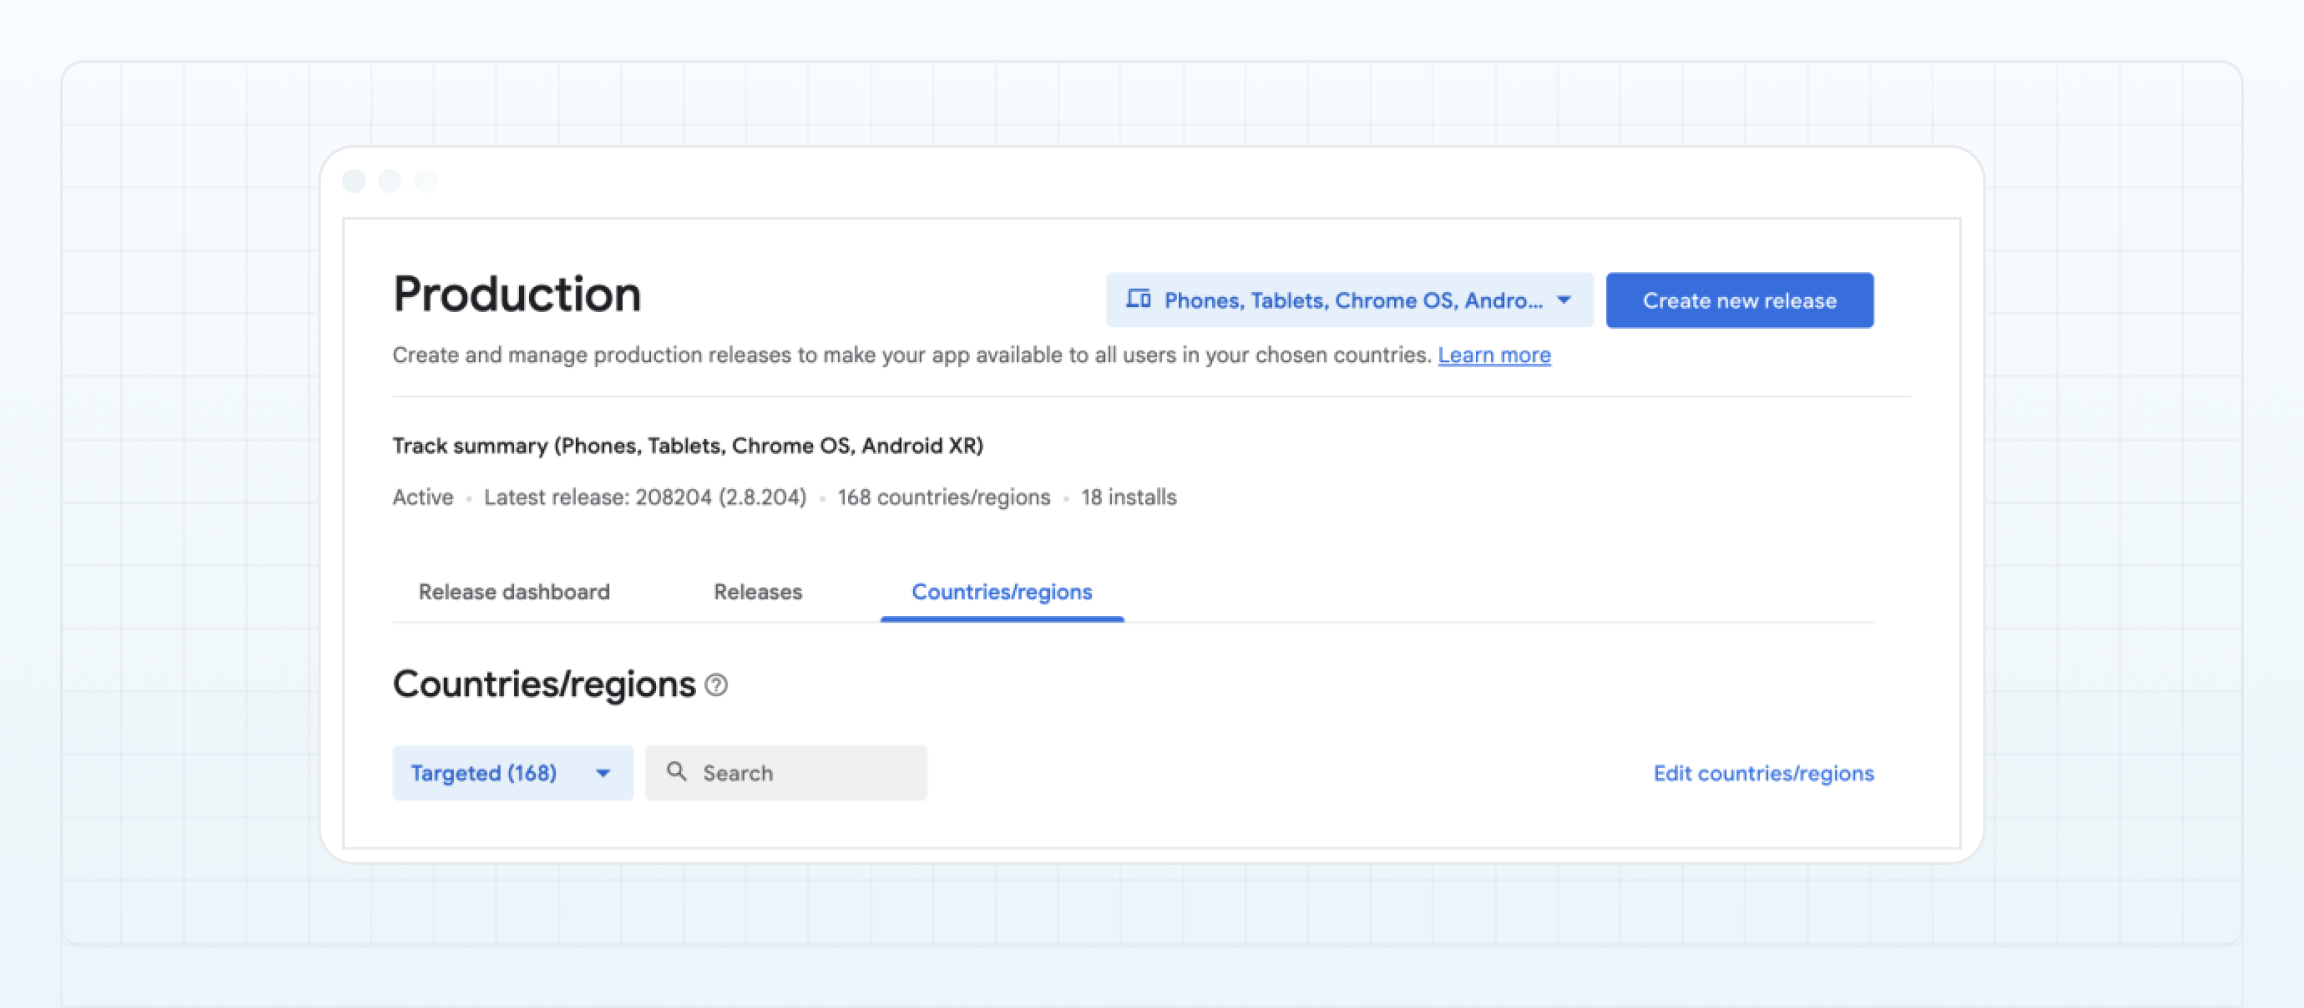
Navigate to Test and release > Production.
Open to the Countries/regions tab and select the countries where you want your app to be available, according to the licenses that allow you to distribute the app and provide services.
Click Create new release in the upper-right corner.
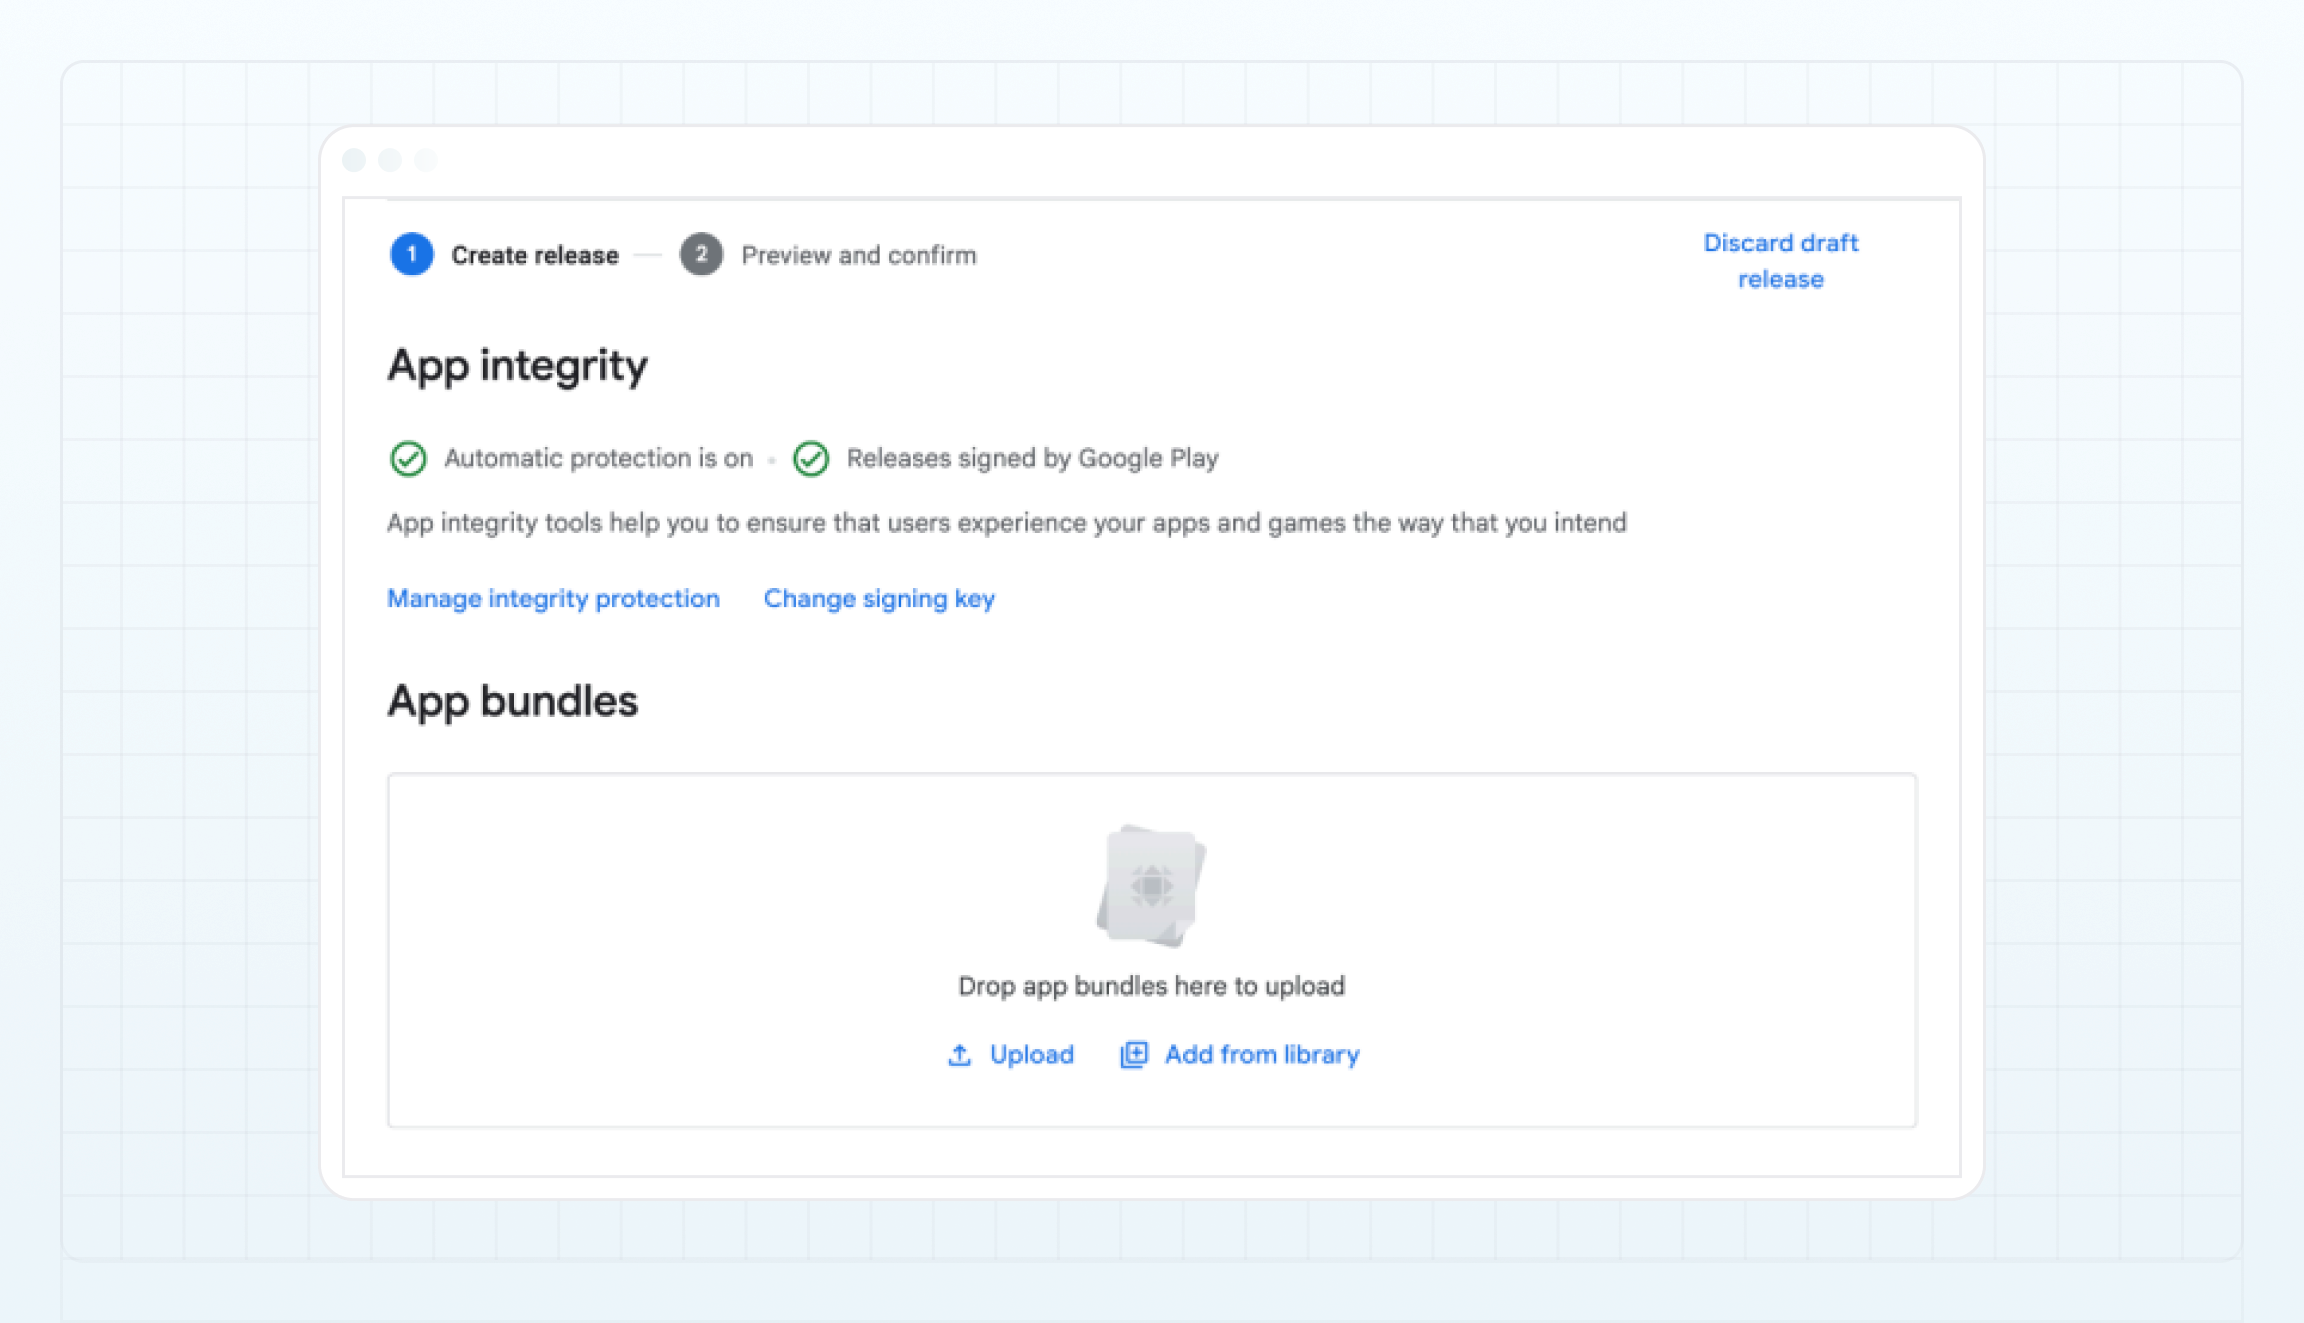
Click Change signing key.
Google Play uses app signing based on cryptographic keys to verify the authenticity and security of your app.
Proper configuration of Google Play App Signing is critical to ensure a secure deployment and, where applicable, a smooth transition for existing .apk users to the Google Play version.
Download the encryption public key.
- Select the option Upload a new app signing key from Java keystore.
- Click Download encryption public key (Option 1).
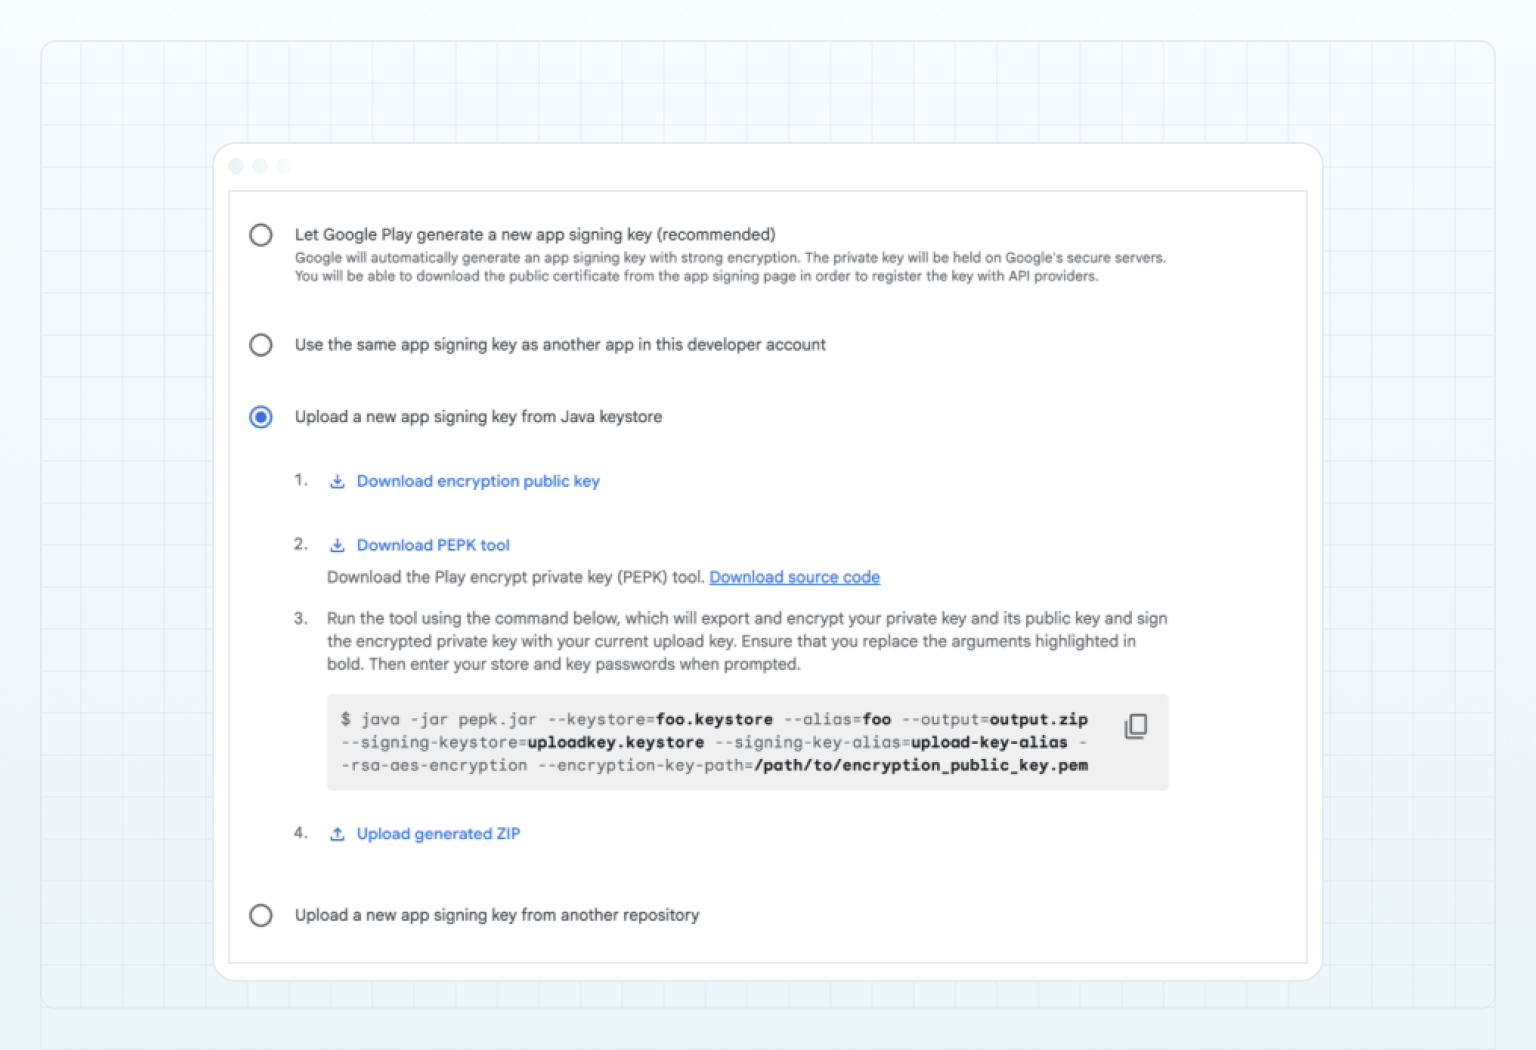
Send the downloaded key in the .pem file format to the B2CORE team either by emailing android-support@b2broker.com or through your account manager.
The B2CORE team will generate an app signing key, encrypt it using the provided public encryption key, and return it to you together with your application in .aab format, signed with the same key. This process may take some time.
After receiving the signed app bundle (.aab) and the app signing key archive (.zip), return to Test and release > Production > Releases > Untitled release.
On the Releases page, click Edit release.
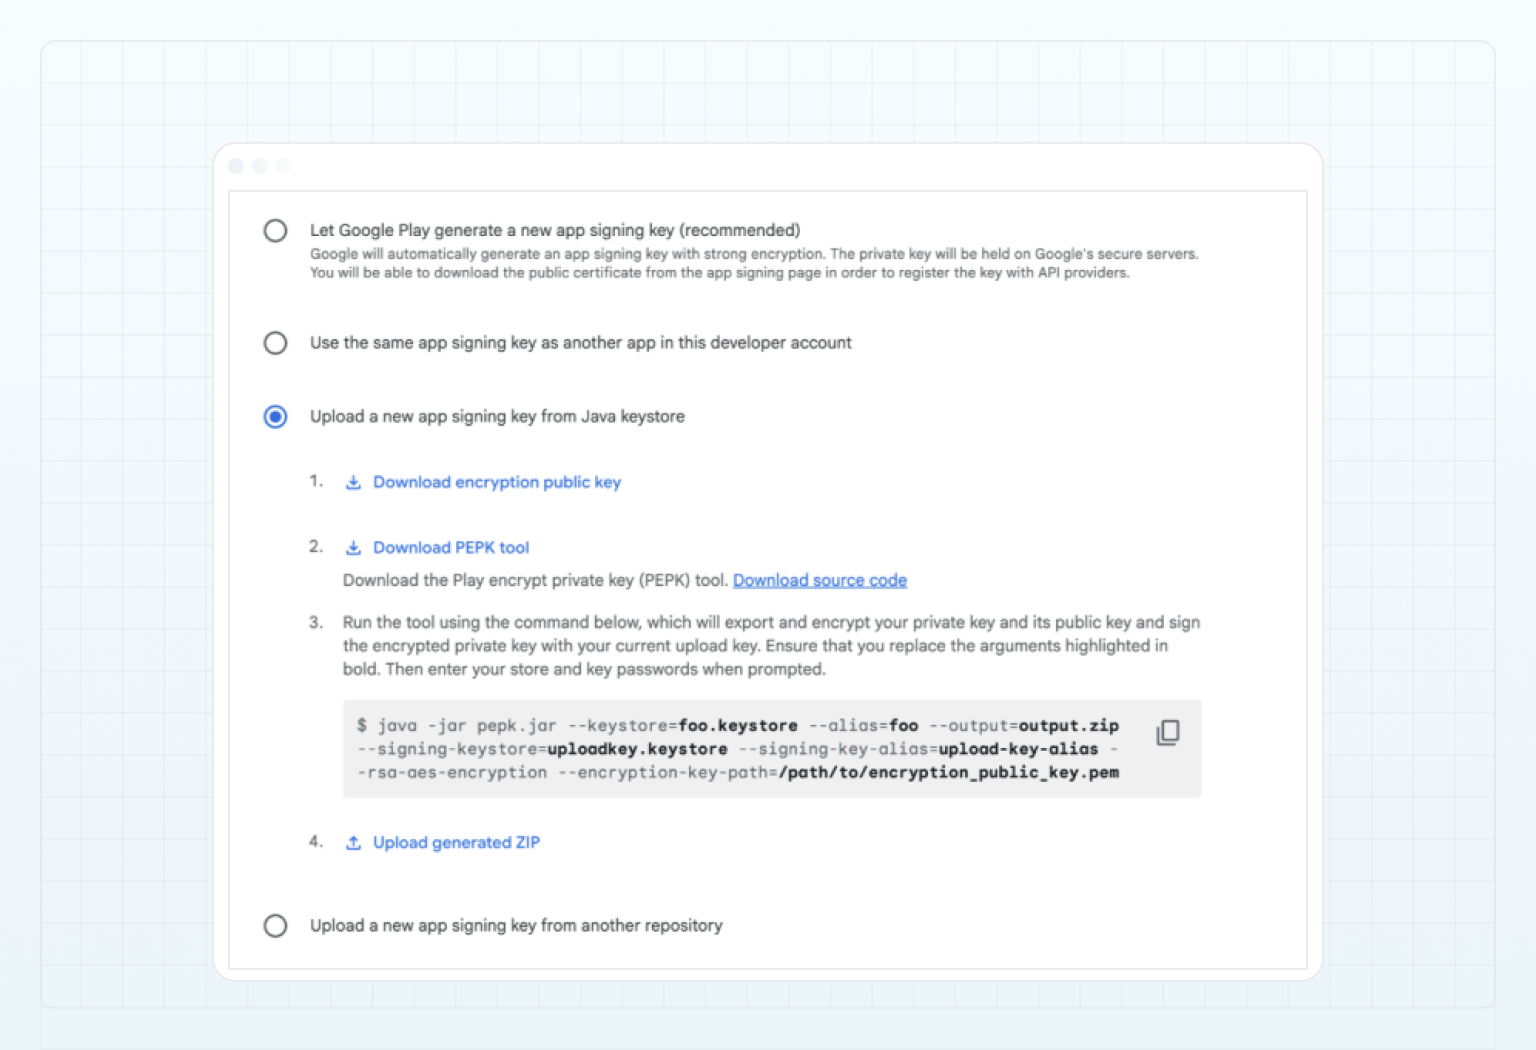
Upload the received app signing key (.zip).
- Select the option Upload the app signing key (.zip).
- Click Upload generated ZIP (Option 4).
Upload the received app bundle (.aab).
-
Drag and drop the provided
.aabfile. Don't modify it. -
After uploading, make sure no errors are shown.
You may see the following warning message. This is expected and can be safely ignored.
Warning
This App Bundle contains native code, and you've not uploaded debug symbols. We recommend that you upload a symbol file to make your crashes and ANRs easier to analyze and debug.
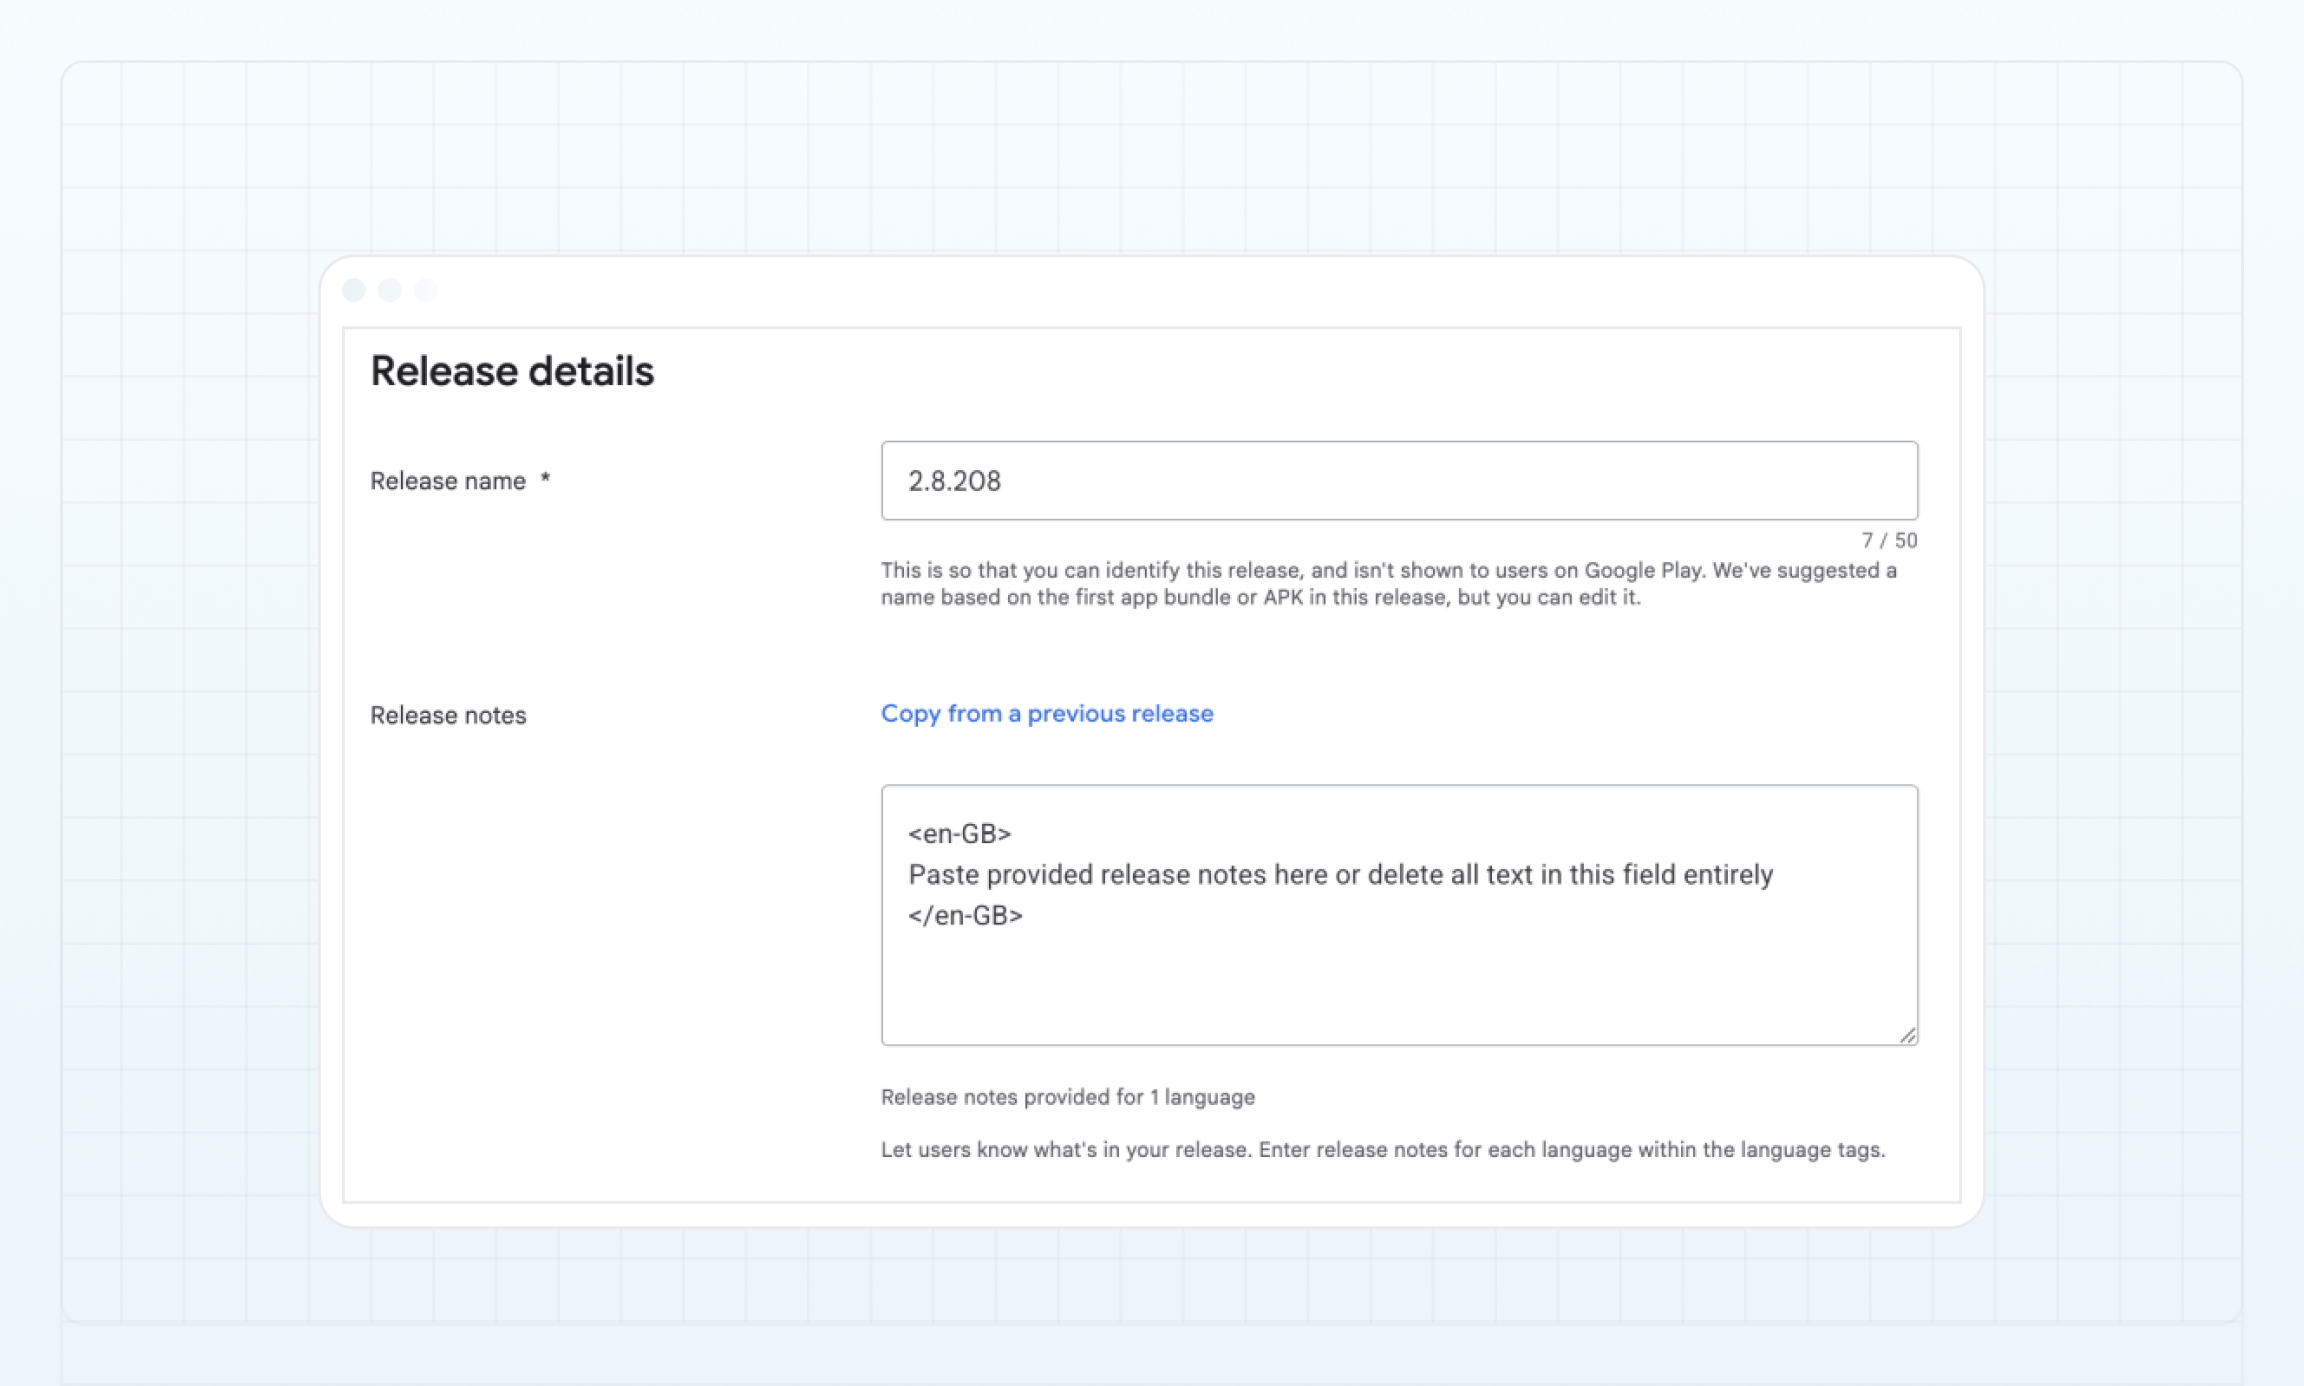
Fill in the Release details.
- The Release name field is filled in automatically after uploading the
.aabfile. - In the Release notes field, paste the release notes provided by the B2CORE team or leave the field empty.
Click Next.
Review the release information and make sure there are no errors highlighted in red.
You may see the following warning message. This is expected and can be safely ignored.
Warning
This App Bundle contains native code, and you've not uploaded debug symbols. We recommend that you upload a symbol file to make your crashes and ANRs easier to analyze and debug.
Start the rollout.
- Click Save to submit the app for Google review.
- You will be redirected to Publishing overview, where you must click Send X changes for review.
App review and rollout may take several days. The review will result either in successful publication on Google Play or in a rejection with the reason provided. If you experience issues resolving a rejection, contact the B2CORE team at android-support@b2broker.com.
Step 8. After approval: app monitoring
After your app is approved, regularly check its availability and policy compliance to avoid enforcement actions.
Failure to perform these checks may result in policy violations, app removal, suspension, or permanent termination of your developer account in the Play Console, often without prior notice.
Check app availability
Confirm that the app is visible on Google Play in all allowed countries and that installation and basic functionality work as expected.
Check compliance
Keep your app listing, privacy policy, and country distribution aligned with your current licenses and legal permissions.
Monitor policy status
Periodically check if any actions required in Monitor and improve > Policy and programmes > Policy status.
Review app content
Periodically check if any actions required in Monitor and improve > Policy and programmes > App content. Ensure that all app information is up to date.
Monitor Google Play communications
Regularly check the contact email linked to your Google Play Console and respond promptly to any notifications.
Google Play policies and deployment processes change regularly. If you notice any missing or outdated information in this instruction, contact us at android-support@b2broker.com for assistance or clarification.
Last updated on